
If you’ve ever wanted to boost the strength and durability of your stainless steel projects, heat treating is the key. But you might be wondering—can you really do this at home without expensive equipment or a lab?
The answer is yes, and this guide will show you exactly how. By learning simple steps and safety tips, you’ll be able to improve your metalwork like a pro. Ready to unlock the full potential of your stainless steel? Keep reading, and you’ll discover easy techniques that anyone can master.
Basics Of Stainless Steel Heat Treatment
Heat treating stainless steel changes its structure to improve strength and durability. It involves heating and cooling the metal carefully. This process helps achieve better hardness and corrosion resistance. Knowing the basics of heat treatment is key before starting at home.
Types Of Stainless Steel
Stainless steel comes in different types based on its makeup. The main types are:
- Austenitic:Contains high levels of chromium and nickel. It is non-magnetic and has good corrosion resistance.
- Ferritic:Contains chromium but little or no nickel. It is magnetic and less ductile.
- Martensitic:Contains chromium and higher carbon. It is magnetic and can be hardened by heat treatment.
- Duplex:A mix of austenitic and ferritic. It offers high strength and corrosion resistance.
Knowing the type helps select the right heat treatment method.
Purpose Of Heat Treatment
Heat treatment improves stainless steel in many ways:
- Hardness:Makes the metal tougher to resist wear and tear.
- Strength:Increases the metal’s ability to handle stress.
- Corrosion Resistance:Enhances protection against rust and chemicals.
- Machinability:Makes the steel easier to cut and shape.
- Relieving Stress:Removes internal stresses caused by welding or forming.
Each goal requires a different heat treatment approach.
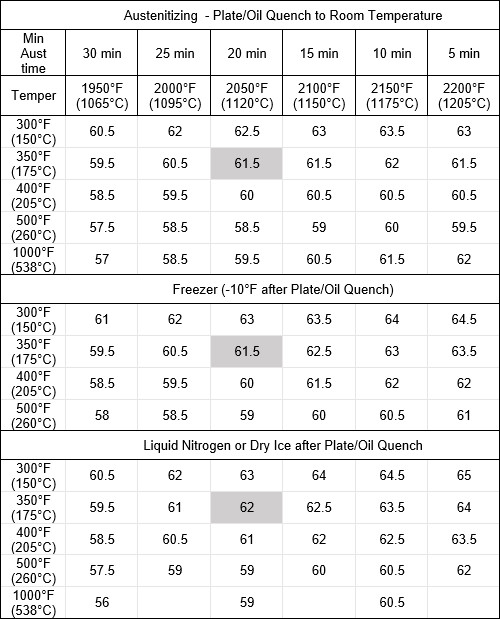
Credit: thermalprocessing.com
Essential Tools And Equipment
Heat treating stainless steel at home requires specific tools and equipment. The right setup helps achieve the desired metal properties safely and effectively. Understanding which tools to use can make the process smooth and accurate.
Heat Source Options
Choosing the right heat source is crucial for proper heat treatment. Common options include:
- Propane torch – portable and easy to control
- Electric kiln – provides consistent temperature
- Oven with temperature control – suitable for smaller pieces
- Forge – offers high heat for larger projects
Each source has pros and cons. Select one based on the size of your stainless steel and the heat needed.
Protective Gear
Safety is key during heat treatment. Use proper protective gear to avoid burns and injuries.
- Heat-resistant gloves – protect hands from high temperatures
- Safety glasses – shield eyes from sparks and hot metal
- Apron or protective clothing – prevents burns on skin
- Respirator mask – guards against harmful fumes
Always wear protective gear before starting the heating process.
Measuring Instruments
Accurate temperature control improves heat treatment results. Use these instruments to measure heat precisely:
- Infrared thermometer – measures surface temperature quickly
- Thermocouple – provides exact temperature readings inside the metal
- Pyrometer – ideal for very high temperatures
Monitoring temperature prevents overheating or underheating the stainless steel.
Preparing Stainless Steel For Heat Treatment
Preparing stainless steel properly before heat treatment is key to achieving the best results. It’s not just about heating the metal; careful preparation sets the stage for even heating and prevents surface damage or unwanted changes in the material. Taking time here can save you from costly mistakes later on.
Cleaning And Inspection
Start by thoroughly cleaning your stainless steel piece. Any dirt, grease, or oxidation can affect how the heat treatment interacts with the metal. Use a degreaser or warm soapy water and scrub with a non-abrasive brush.
After cleaning, inspect the surface closely. Look for scratches, cracks, or rust spots that might worsen during heating. If you find any damage, address it before moving forward—sometimes a quick sanding or polishing can make a big difference.
Marking And Setting Up
Mark your stainless steel clearly to keep track of different areas or to note where you want specific heat treatments. Use a high-temperature resistant marker or scribe tool for this purpose. This step helps you maintain control throughout the process.
Next, set up your workspace for safety and efficiency. Make sure you have heat-resistant gloves, eye protection, and a stable surface to work on. Arrange your heating tools so they’re easy to access but won’t accidentally touch anything flammable.
How will you organize your workspace to keep the process smooth and safe? Preparing thoughtfully can turn a challenging heat treatment into a manageable and even enjoyable project.
Heating Process Steps
Heating stainless steel at home requires attention to detail and a clear understanding of the heating process steps. Proper control over temperature and time can make the difference between a successful heat treatment and damaged metal. Let’s dive into how you can manage these variables effectively and avoid common pitfalls.
Choosing The Right Temperature
Stainless steel needs precise temperatures to change its properties without harming its structure. The ideal range usually falls between 1,900°F and 2,100°F (1,038°C to 1,149°C) depending on the alloy. Using a reliable thermometer or infrared temperature gun helps you stay within this range.
Heating too low won’t trigger the changes you want, while overheating can cause grain growth and weaken the steel. Have you ever overheated a metal and noticed it became brittle? That’s exactly what you want to avoid here.
Controlling Heating Time
How long you hold the steel at the target temperature matters just as much as hitting the right temperature itself. Typically, a few minutes per millimeter of thickness is enough to achieve the desired effect. For instance, a 5mm thick piece might need about 10-15 minutes at temperature.
Too short, and the steel won’t transform properly; too long, and you risk scaling or warping. Use a timer and stay nearby to monitor the process closely. Have you tried leaving steel in the heat too long and noticed unwanted discoloration or warping?
Avoiding Common Mistakes
Many beginners make the mistake of rushing the heating process or using uneven heat sources. Avoid direct flames unless you have experience, as they create hot spots that can damage the steel. Instead, use a heat treat oven, kiln, or even a charcoal forge that allows for even heat distribution.
Also, don’t forget to wear protective gear and work in a well-ventilated area. A common error is skipping the cooling phase or cooling too quickly, which can cause cracking. Have you ever cooled a hot metal too fast and ended up with an unexpected fracture?
Cooling Techniques
Cooling plays a crucial role in heat treating stainless steel. It controls the metal’s hardness, strength, and toughness. Different cooling techniques affect the steel’s final properties. Choosing the right method depends on the steel type and the desired result.
Air Cooling
Air cooling is the slowest way to cool stainless steel. It involves letting the metal cool naturally in open air. This method reduces stress and prevents cracks. It works best for steels that need toughness over hardness. Air cooling is simple and safe for home use.
Water And Oil Quenching
Water and oil quenching cool steel much faster than air. Water cools the steel very quickly, creating a harder surface. Oil cools slower than water, offering a balance between hardness and toughness. Both methods can cause cracks if not done carefully. Quenching is useful when you want a harder steel.
Choosing The Best Method
Match the cooling technique with your steel type. Use air cooling for softer, tougher steel. Choose oil quenching for moderate hardness and less risk of cracking. Water quenching suits steel that needs maximum hardness but watch for cracks. Consider your project’s needs and your skill level before deciding.
Post-treatment Care
After heat treating stainless steel at home, proper post-treatment care is essential. It protects the metal’s new properties and extends its lifespan. Handling the steel carefully ensures it stays strong and durable. Below are key steps to maintain your heat-treated stainless steel effectively.
Cleaning And Polishing
Remove any scale or residue left from heat treating. Use a soft cloth and mild cleaner for gentle cleaning. Avoid harsh chemicals that may damage the surface. Polishing restores the steel’s shine and smooth texture. Use fine-grade polishing compounds or metal polish. Work in small sections with circular motions. Rinse with clean water and dry thoroughly to prevent rust.
Testing Hardness And Strength
Check the steel’s hardness to confirm successful heat treatment. Use a hardness tester or file test for quick assessment. A properly heat-treated piece should resist scratching by a file. Test strength by bending or applying pressure carefully. The steel should feel firm without cracking. These tests ensure your stainless steel meets your needs and is safe to use.
Safety Tips For Diy Heat Treatment
Safety is the foundation of any DIY heat treatment project, especially when working with stainless steel at home. Heat treating involves high temperatures and potentially hazardous materials, so protecting yourself and your workspace is essential. Let’s focus on key safety tips that keep your process smooth and risk-free.
Handling Hot Materials
Always assume everything near your heat source is extremely hot. Use thick, heat-resistant gloves to protect your hands from burns and avoid touching heated metal directly.
Keep a sturdy pair of tongs or pliers handy to move or hold the stainless steel pieces while they are hot. This keeps your hands safely away from the heat and gives you better control.
Have a designated cooling area with a fireproof surface like a metal tray or brick. This prevents accidental fires and keeps hot items from damaging your workspace.
Ventilation And Fire Safety
Good airflow is crucial. Heating stainless steel can release fumes that are harmful if inhaled. Work in a well-ventilated area or near an open window, and use a fan if possible to push fumes away from your breathing zone.
Never heat treat near flammable materials. Clear your workspace of papers, cloth, and liquids that can catch fire.
Keep a fire extinguisher rated for metal and electrical fires within reach. It’s better to have one and not need it than the opposite.

Credit: www.reliance-foundry.com
Common Issues And Troubleshooting
Heating stainless steel at home can be rewarding but also tricky. You might face issues that affect the metal’s strength and appearance. Knowing how to identify and fix these problems will save you time and materials.
Cracking And Warping
Cracking often happens because the metal cools too quickly or unevenly. Avoid sudden temperature changes by cooling the steel slowly, ideally in still air or wrapped in a heat-resistant blanket.
Warping occurs when different parts of the steel expand or contract at different rates. To prevent this, heat the metal evenly and avoid overheating thin sections.
Have you ever noticed your piece bending or splitting right after heating? Try reheating gently and allowing it to cool more gradually next time.
Uneven Hardness
Uneven hardness means some areas are softer or harder than others. This often results from inconsistent heating or cooling.
Use a reliable heat source and monitor the temperature closely. Moving the steel regularly during heating can help maintain uniform heat distribution.
Testing hardness with a simple file or scratch test after treatment can guide you on whether you need to reheat specific spots.

Credit: www.reliance-foundry.com
Frequently Asked Questions
What Is The Best Way To Heat Treat Stainless Steel?
The best way to heat treat stainless steel is to use a controlled heat source. Ensure the temperature reaches between 1000°C and 1100°C. Allow the steel to cool slowly to avoid warping. Always follow safety guidelines to prevent accidents.
Can You Heat Treat Stainless Steel At Home Safely?
Yes, you can heat treat stainless steel at home safely with proper equipment. Always use a controlled heat source and wear protective gear. Ensure good ventilation to avoid inhaling fumes. Follow safety guidelines to prevent accidents and ensure a successful process.
What Equipment Do You Need For Heat Treating?
You need a furnace or kiln, heat-resistant gloves, and safety goggles. A controlled heat source is essential for precise temperature control. Use a thermometer to monitor the temperature. Ensure your workspace is well-ventilated and follow safety precautions.
How Long Does It Take To Heat Treat Stainless Steel?
The heat treatment process for stainless steel can take several hours. The time depends on the steel type and desired properties. Heating typically takes between 1 to 2 hours, followed by a cooling period. Always follow specific guidelines for your stainless steel type.
Conclusion
Heat treating stainless steel at home takes care and patience. Follow safety steps to protect yourself. Use the right tools and temperature for best results. Practice on small pieces before larger projects. This process can improve steel’s strength and durability.
Keep learning to improve your skills over time. Your effort will pay off with better metalwork. Try it yourself and see the difference.