
How to Heat Treat 1095 Steel at Home: If you’ve ever wanted to make your own knives, tools, or blades, knowing how to heat treat 1095 steel at home is a game changer. This simple process can turn raw steel into a tough, sharp, and durable material that stands up to real use.
Imagine holding a blade you crafted yourself, one that performs just like a professional’s. In this guide, you’ll discover easy steps and insider tips to heat treat 1095 steel without expensive equipment or a workshop. Ready to unlock the full potential of your steel?
Keep reading, and you’ll learn exactly how to do it right.
Choosing 1095 Steel
Choosing the right steel is crucial before you start heat treating at home. 1095 steel stands out for many knife makers and hobbyists due to its unique qualities. Understanding what makes 1095 special will help you decide if it fits your project and skill level.
Properties Of 1095 Steel
1095 steel is a high-carbon steel, meaning it has about 0.95% carbon content. This higher carbon content gives it excellent hardness and edge retention after heat treatment.
It is also relatively simple to heat treat compared to other steels, which makes it a favorite among beginners. However, its high carbon makes it prone to rust, so you’ll need to take care of it properly.
- Hardness:Can reach up to 60-62 HRC (Rockwell Hardness Scale)
- Toughness:Good, but not as high as some alloy steels
- Wear Resistance:Excellent, holds an edge well
- Corrosion Resistance:Low, requires oiling or coating
Common Uses
1095 steel is popular in making knives, swords, and other cutting tools. If you want a blade that can hold a sharp edge and is easy to sharpen, 1095 is a solid choice.
Many outdoor enthusiasts and survivalists prefer 1095 for its durability and reliability. It’s also widely used in tool making, such as for chisels and punches, where toughness and edge retention matter.
Have you considered what type of projects you want to create? Your choice of steel can make the difference between a blade that performs well and one that disappoints.

Credit: knifesteelnerds.com
Essential Tools And Equipment
Before you start heat treating 1095 steel at home, gathering the right tools and equipment is crucial. Each item plays a specific role in ensuring your steel reaches the perfect hardness and durability. Missing or using improper gear can lead to poor results or even safety hazards.
Heat Sources
Your heat source must reach and maintain the critical temperature of about 1475°F (800°C) for 1095 steel. A propane forge is a popular choice because it heats evenly and is relatively easy to control. Alternatively, an electric kiln or a charcoal forge can work well if you can monitor the temperature closely.
Have you considered how uniform your heat source is? Uneven heating can cause warping or inconsistent hardness. Using a temperature gauge or infrared thermometer helps you maintain the right heat level throughout the process.
Quenching Materials
Quenching rapidly cools the steel to lock in hardness. Common quenching materials include water, oil, and specialized quenchants. Water cools too quickly and can cause cracking, so many prefer using light motor oil or commercial quenching oil for better control.
Think about the size and shape of your steel piece. Larger blades may need a slower quench to avoid stress, while smaller pieces can handle quicker cooling. Always have your quenching medium ready and at room temperature before heating your steel.
Safety Gear
Heat treating involves extreme temperatures and potentially hazardous materials. Protect your eyes with safety goggles or a welding helmet. Heat-resistant gloves and a heavy apron shield your hands and body from burns.
Don’t underestimate proper ventilation too. Fumes from quenching oils or burning fuels can be harmful. Setting up near an open window or outdoors keeps fresh air flowing while you work.
Preparing The Steel
Preparing 1095 steel before heat treating is crucial. Proper preparation ensures even heating and better results. The steel must be clean and shaped correctly. Marking heat zones helps control temperature during the process.
Cleaning And Shaping
Start by removing all dirt, oil, and rust from the steel. Use a wire brush or sandpaper for cleaning. Clean steel heats evenly and avoids spots that can cause weak areas.
Next, shape the steel to your desired form. Use a grinder or file to smooth rough edges. Proper shaping helps the steel heat uniformly and reduces warping risks.
Marking Heat Zones
Mark areas that need different heat levels. Use a marker or chalk to draw zones clearly. This helps control heating and cooling phases carefully.
Identifying heat zones prevents overheating in some parts. It also protects delicate sections from damage. Clear markings guide you through the heat treatment steps smoothly.

Credit: knifesteelnerds.com
Heat Treating Process
The heat treating process is essential for improving 1095 steel’s hardness and durability. It changes the steel’s internal structure to make it stronger. This process involves carefully heating and cooling the steel. Each step must be done with attention to detail. Proper heat treatment ensures the steel performs well in cutting or other tough tasks.
Heating To Critical Temperature
Heating 1095 steel to the right temperature is key. The steel must reach about 1475°F (800°C). This is called the critical temperature. At this point, the steel’s structure changes, allowing it to harden later. Use a reliable heat source like a forge or kiln. Heat the steel evenly to avoid warping. Avoid overheating, which can damage the steel.
Soaking Time
After reaching the critical temperature, soak the steel. Soaking means keeping the steel hot for a set time. This lets the heat fully penetrate the metal. For 1095 steel, soak for about 10 to 15 minutes per inch of thickness. This step ensures the steel’s core reaches the right temperature. Uniform heating leads to better hardness and strength.
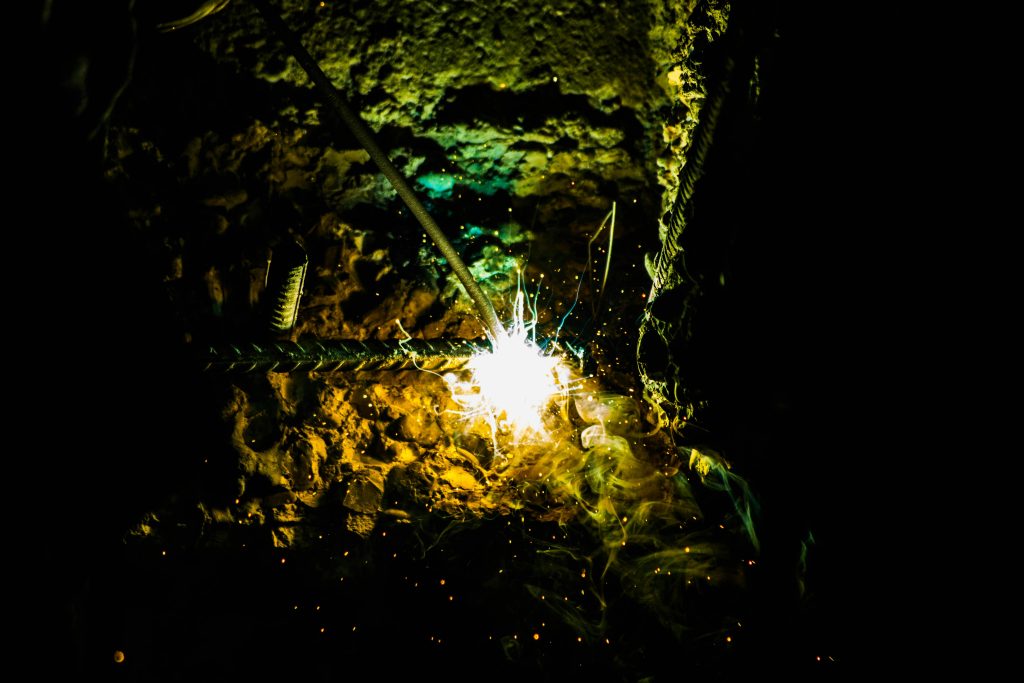
Quenching Techniques
Quenching is a vital step in heat treating 1095 steel. It quickly cools the metal to lock in hardness and strength. The right technique prevents cracks and warping. Choosing the quench medium and controlling speed and angle are key factors. These choices affect the final quality of your steel.
Choosing The Right Quench Medium
Water is the fastest and most common quench medium for 1095 steel. It cools quickly but can cause cracks if not handled carefully. Oil is slower and gentler, reducing the risk of cracks. It gives a more uniform hardness. Some use specialized quenchants like brine or synthetic liquids for faster cooling. The choice depends on your skill and desired results.
- Water:Fast cooling, higher crack risk.
- Oil:Slower cooling, safer for thin blades.
- Brine:Faster than water, very harsh.
- Synthetic quenchants:Controlled cooling, less risk.
Quench Speed And Angle
Speed matters during quenching. Quickly moving the steel into the medium avoids uneven cooling. Keep the steel moving to prevent warping. The angle at which you enter the quench affects how evenly the steel cools. Starting with the edge or tip first is common for knives. It helps avoid trapped air and cools the blade evenly.
- Immerse steel rapidly to avoid uneven hardening.
- Move steel gently during quench to reduce stress.
- Hold blade at an angle to prevent air pockets.
- Start quench with the edge for uniform cooling.
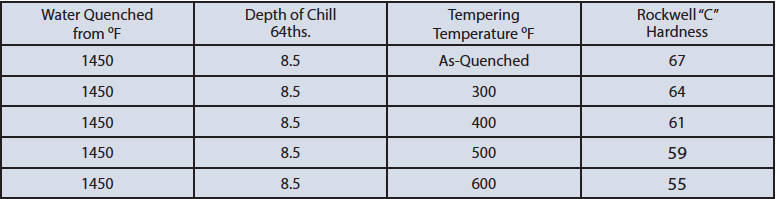
Tempering 1095 Steel
Tempering 1095 steel is a crucial step after hardening to reduce brittleness while maintaining strength. It helps relieve stresses formed during quenching and improves the steel’s toughness. If you skip tempering, your blade or tool might crack or break under pressure.
Temperature Settings
The temperature you choose directly affects your steel’s final hardness and flexibility. For 1095 steel, tempering usually happens between 350°F and 450°F (175°C to 230°C). Lower temperatures keep the steel harder but more brittle, while higher temperatures increase toughness but reduce hardness.
Think about what you want from your steel. Are you making a knife that needs to hold a sharp edge, or a tool that must endure impact? Adjust the tempering temperature accordingly. I once tempered a blade at 400°F and got a perfect balance for everyday use—sharp but tough enough not to chip easily.
Timing And Cycles
The time you hold the steel at tempering temperature is just as important as the temperature itself. Typically, you want to temper for about 1 to 2 hoursper cycle to allow the steel to stabilize. Too short, and the internal stresses won’t fully relax; too long, and you might lose hardness unnecessarily.
Multiple cycles can improve results, especially if you want a more reliable and uniform temper. I recommend tempering twice, letting the steel cool down to room temperature between cycles. This approach helped me avoid cracking in a heavy-duty blade I made last year.
- Heat the steel evenly to avoid warping.
- Use an oven or a heat-treating kiln for precise temperature control.
- Allow the steel to cool slowly after tempering to stabilize its structure.
Have you noticed how small changes in time and temperature impact your steel’s behavior? Experiment with your own setups and keep notes—it’s the best way to master tempering 1095 steel at home.
Testing Hardness And Flexibility
Testing the hardness and flexibility of 1095 steel after heat treating is crucial to ensure your blade or tool performs well. These tests help confirm whether the steel has reached the right balance between strength and toughness. You don’t need fancy equipment; some simple, hands-on checks can give you a clear picture of your steel’s condition.
Simple Hardness Tests
One of the easiest ways to check hardness is the file test. Take a small, smooth file and try to scrape it against the steel’s edge or surface.
- If the file skids off without leaving marks, your steel is hard enough.
- If the file bites in or scratches easily, the steel needs more hardening.
You can also try the “spark test” by grinding a small area and watching the sparks. Harder steel produces longer, more vibrant sparks. It’s a quick way to compare your treated steel against a known sample.
Flexibility Checks
Hardness is important, but flexibility prevents brittleness. To test flexibility, gently bend the blade or steel piece without forcing it.
- If it bends slightly and returns to its original shape, your steel has good flexibility.
- If it cracks or stays bent, the steel is too brittle and may need tempering adjustment.
Try tapping the edge lightly with a small hammer. A sharp, ringing sound usually means good resilience. Dull or cracking sounds signal problems.
Have you noticed how a blade that’s too hard can snap unexpectedly? Balancing hardness with flexibility can save you from that frustration.
Common Mistakes To Avoid
Heat treating 1095 steel at home requires care and attention. Avoiding common mistakes ensures better results and prevents damage. Many beginners make errors that affect the steel’s hardness and durability. Knowing what to avoid helps keep your project on track.
Overheating And Burning
Heating 1095 steel too long or too hot causes burning. The steel can lose carbon, making it soft. Burned steel looks dark and rough. It loses strength and won’t harden well.
Use a reliable heat source and watch the temperature closely. Stop heating once the steel reaches the right color, usually bright red. Avoid heating past this point. Keep the steel moving to prevent hot spots.
Improper Quenching
Quenching cools the steel quickly to harden it. Using the wrong liquid or temperature causes cracks or warping. Water is fast but can be too harsh, causing breaks. Oil cools slower and is safer for 1095 steel.
Ensure the quenching liquid is clean and at the right temperature. Stir the steel gently during quenching to cool evenly. Avoid shaking or banging the steel, which can cause damage. Proper quenching keeps the steel tough and strong.
Maintaining Treated Steel
Maintaining treated 1095 steel is just as important as the heat treatment process itself. Proper care ensures your steel keeps its hardness and resists damage over time. Neglecting maintenance can lead to rust or loss of performance, undoing all your hard work.
Preventing Rust
Rust is the biggest enemy of 1095 steel after heat treatment. Because this steel has a high carbon content, it’s prone to corrosion if left exposed to moisture or air.
To prevent rust, always apply a thin layer of oil or wax after handling the steel. This barrier stops moisture from settling on the surface. I once left a knife untreated overnight, and it developed tiny rust spots by morning—something easily avoided with a quick wipe of mineral oil.
Regularly inspect your steel for any signs of discoloration or surface changes. If you spot rust early, remove it gently using fine steel wool or a rust eraser, then reapply oil. Waiting too long can cause deeper damage that’s harder to fix.
Storage Tips
Where and how you store your treated steel affects its longevity. Avoid storing steel in damp or humid places like basements or garages without climate control.
Instead, keep your steel in a dry, well-ventilated area. Using silica gel packs or moisture absorbers in your storage container adds extra protection against humidity. I keep my blades in a wooden box lined with oil-soaked cloth, which helps maintain a stable environment and prevents rust.
Consider wrapping your steel in a soft cloth after oiling it before storage. This prevents dust buildup and minor scratches. Also, avoid plastic bags as they can trap moisture and accelerate corrosion.
Credit: hudsontoolsteel.com
Frequently Asked Questions
How Do You Heat Treat 1095 Steel?
To heat treat 1095 steel, heat it to 1475°F (800°C) until it becomes non-magnetic. Then, quench it in oil to harden. Temper the steel at around 400°F (204°C) to achieve the desired hardness and toughness. This process enhances durability and edge retention.
What Oil Should I Use For Quenching 1095 Steel?
For quenching 1095 steel, use a fast-quenching oil like Parks 50 or canola oil. These oils cool the steel quickly, preventing cracks and ensuring proper hardness. Always ensure the oil is at room temperature to achieve optimal results in the heat treatment process.
Can You Heat Treat 1095 Steel Without A Forge?
Yes, you can use a propane torch or a home oven. Ensure even heating to the critical temperature of 1475°F (800°C). Quench promptly in oil and follow up with proper tempering. This method is accessible for hobbyists who lack a full forge setup.
How Long Should 1095 Steel Be Tempered?
Temper 1095 steel for one to two hours at 400°F (204°C). This reduces brittleness while maintaining hardness. The exact time and temperature depend on the desired properties. Always cool the steel gradually after tempering to avoid introducing stresses or cracking.
Conclusion
Heat treating 1095 steel at home takes patience and care. Follow each step closely for best results. Always use safety gear to protect yourself. Controlling temperature is key to strong, durable steel. Practice helps you improve with each try. Enjoy crafting your own steel tools or knives.
The process may seem complex but becomes easier. Keep learning and experimenting to get better results. Your hard work will pay off in quality steel.