
Are you ready to transform your bathroom floor with beautiful new tiles? Before you start, it’s important to have the right tools on hand.
Using the proper tools not only makes the job easier but also ensures a smooth, professional finish that lasts for years. In this guide, you’ll discover exactly what tools you need to tile your bathroom floor like a pro. Whether you’re a beginner or tackling your first DIY project, knowing which tools to use will boost your confidence and save you time.
Keep reading to find out how to set yourself up for success and avoid common mistakes that can turn a simple tiling job into a headache.
Selecting The Right Tiles
Selecting the right tiles for a bathroom floor is crucial. The choice affects durability, style, and safety. Bathrooms face moisture and heavy use. Tiles must handle this environment well. Choosing the right type, size, and water resistance makes a big difference. Let’s explore these key points to help you pick the best tiles.
Tile Types For Bathrooms
Ceramic and porcelain tiles suit bathroom floors best. They resist water and wear well. Natural stone tiles like marble and granite offer beauty but need more care. Vinyl tiles provide a budget-friendly, water-resistant option. Choose tiles that fit your style and bathroom use.
Size And Thickness Considerations
Tile size impacts the room’s look and feel. Large tiles create a modern, spacious appearance. Smaller tiles offer more grip and fit curved areas better. Thickness matters for durability. Thicker tiles withstand heavy foot traffic and last longer. Match tile thickness to your bathroom floor’s needs.
Water Resistance Features
Bathroom floors must stay safe and dry. Tiles with low water absorption rates prevent damage. Porcelain tiles are highly water-resistant and ideal for wet areas. Glazed tiles add a protective layer, making them easier to clean. Avoid porous tiles that absorb water and stain easily.

Credit: www.youtube.com
Preparing The Surface
Preparing the surface is the foundation of a successful bathroom floor tiling project. If the floor isn’t properly prepared, tiles may not adhere well, leading to cracks and an uneven finish. Taking the time to clean, check, and repair the floor will save you frustration and extra work later on.
Cleaning And Leveling The Floor
Start by removing all dirt, grease, and debris from your bathroom floor. Use a vacuum or broom to clear loose particles, then mop with a mild detergent to tackle any stubborn grime.
After cleaning, check if the floor is level. Use a spirit level to spot dips or high spots. Uneven floors can cause tiles to crack or come loose, so you might need to apply a self-leveling compound to fix these areas.
Checking For Moisture Issues
Bathrooms are prone to moisture, which can ruin tile adhesive and underlayment. Use a moisture meter to detect dampness in your floor.
If you find moisture problems, address the source before tiling. This could mean fixing leaks or improving ventilation to keep the floor dry and ready for tiling.
Repairing Cracks And Holes
Inspect the floor for any cracks or holes that could affect tile adhesion. Small cracks can be filled with patching compound, while larger holes might require a more robust repair.
Make sure the patched areas are smooth and dry before you start laying tiles. Ignoring these repairs can lead to tiles shifting or breaking over time.
Essential Tiling Tools
Essential tiling tools make bathroom floor installation easier and more precise. Having the right tools helps you achieve a smooth, professional finish. Each tool plays a specific role in the tiling process. Understanding their use saves time and prevents mistakes.
Tile Cutter And Wet Saw
A tile cutter is perfect for straight cuts on ceramic or porcelain tiles. It scores the tile, then snaps it cleanly. For tougher or thicker tiles, a wet saw is necessary. It uses a diamond blade and water to cut tiles without cracking them.
Notched Trowel
The notched trowel spreads adhesive evenly on the floor. Its notches create ridges that help tiles stick better. Choosing the right notch size depends on the tile size and type of adhesive.
Rubber Grout Float
A rubber grout float pushes grout into tile joints. It holds grout firmly and helps fill gaps completely. The rubber edge also cleans excess grout from tile surfaces without damage.
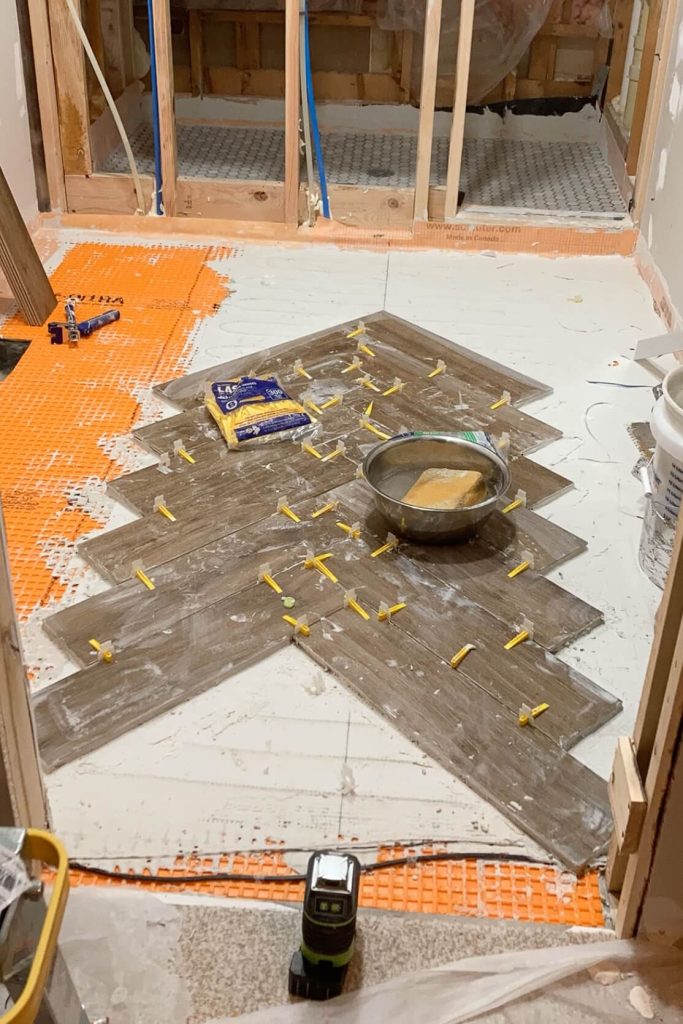
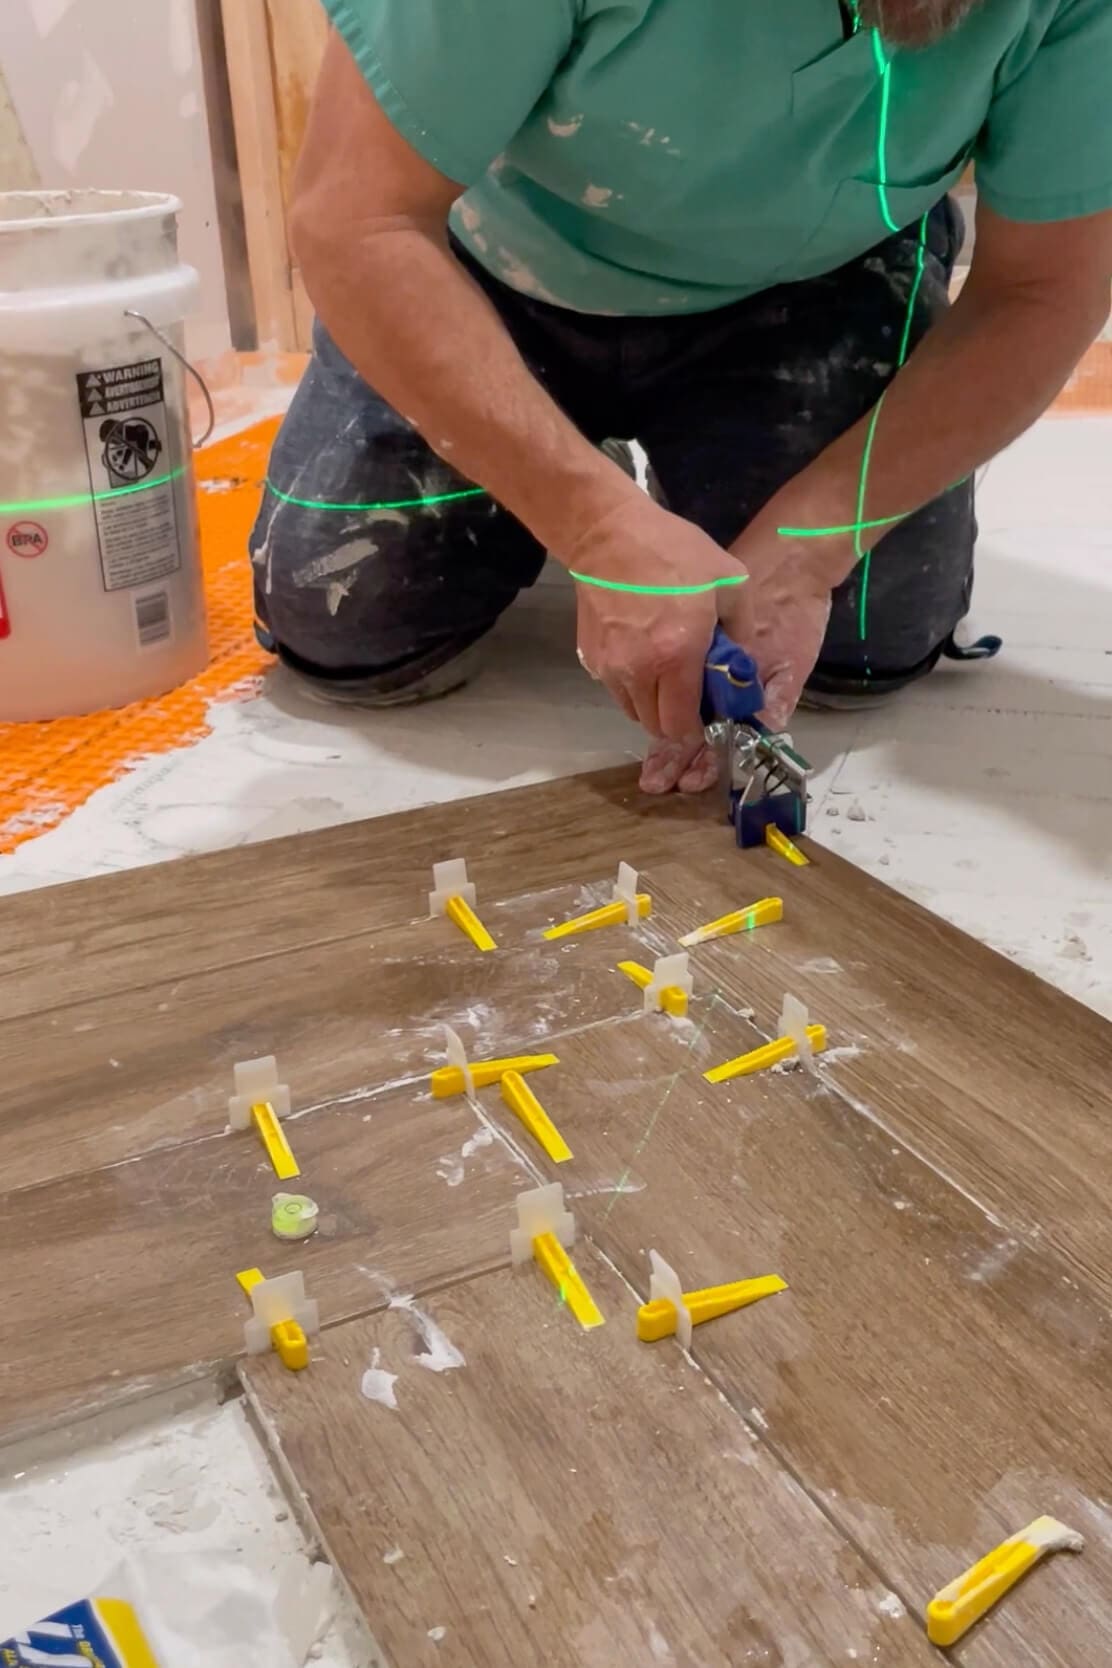
Tile Spacers
Tile spacers keep consistent gaps between tiles. These gaps allow for grout and prevent tiles from shifting. Using spacers ensures even spacing and a neat tile layout.
Level And Measuring Tape
A level checks that tiles are flat and even on the floor. Uneven tiles can cause cracks or trip hazards. Measuring tape helps plan tile placement and cuts accurately. Both tools ensure a balanced and professional result.
Materials Needed
Preparing to tile a bathroom floor requires specific materials to ensure a strong and lasting installation. Choosing the right supplies affects both the appearance and durability of the tiles. This section covers the essential materials needed for tiling.
Thinset Mortar
Thinset mortar is the glue that sticks tiles to the floor. It is a cement-based adhesive designed to hold tiles firmly in place. Use a high-quality thinset suitable for bathroom floors to resist moisture and wear.
Thinset comes in powder form and needs mixing with water before use. Apply it evenly with a notched trowel to create a strong bond. Proper thinset ensures tiles stay flat and secure for years.
Grout Types
Grout fills gaps between tiles, preventing dirt and water from getting underneath. It comes in several types, including sanded and unsanded grout.
- Sanded groutcontains small sand particles and is best for wider joints (usually 1/8 inch or more).
- Unsanded groutis smoother and works well for narrow joints less than 1/8 inch wide.
Select grout that matches tile color and suits bathroom moisture conditions. Proper grout prevents cracks and keeps the floor looking neat.
Sealants And Primers
Sealants protect grout and tiles from water damage and stains. Apply a grout sealer after the grout cures to maintain its color and strength.
Primers prepare the floor surface before tiling, improving thinset adhesion and preventing moisture problems. Use a primer especially on concrete or wooden subfloors.
Sealants and primers extend the life of your tile floor and keep it easy to clean.
Safety Gear For Tiling
Safety gear is often overlooked but is essential when tiling a bathroom floor. Protecting yourself helps avoid injuries that can slow down your progress or cause long-term damage. Wearing the right safety equipment lets you focus fully on your work, making the job smoother and more enjoyable.
Gloves And Knee Pads
Gloves protect your hands from sharp tile edges and harsh adhesives. They also provide a better grip, preventing slips that could lead to accidents. Knee pads are a must-have since tiling means spending hours kneeling. Without them, your knees will ache and tire quickly, reducing your efficiency.
Think about how much time you spend on your knees during tiling. Wouldn’t it be smarter to invest in comfortable knee pads and avoid unnecessary pain?
Safety Glasses
Cutting tiles or mixing grout creates dust and small particles that can harm your eyes. Safety glasses shield your eyes from flying debris and splashes. Even if you’re careful, accidents happen fast—protecting your vision is non-negotiable.
Have you ever gotten dust in your eyes while working on a project? Wearing safety glasses can save you from that uncomfortable experience.
Dust Mask
Tiling generates fine dust that can irritate your lungs and throat. A dust mask filters out harmful particles, helping you breathe clean air throughout the job. This is especially important if you’re working in a small, unventilated bathroom.
Would you want to risk breathing in dust that could cause coughing or worse? A simple dust mask is an easy way to keep your respiratory system safe.

Credit: www.youtube.com
Additional Helpful Tools
Besides the essential tools for tiling, some additional items can make your bathroom floor project smoother and more efficient. These helpful tools save time, reduce mess, and improve precision. You might overlook them at first, but once you start, you’ll wonder how you managed without them.
Buckets And Sponges
Buckets are crucial for mixing grout or thin-set mortar. Choose a sturdy bucket that’s easy to carry and won’t tip over. Having one or two buckets allows you to prepare your materials and rinse your tools simultaneously.
Sponges are your best friend during the grouting phase. Use a damp sponge to wipe off excess grout without damaging the tiles. Remember to rinse the sponge frequently to keep your cleaning effective and avoid spreading grout haze.
Mixing Paddle
Mixing mortar or grout by hand is tiring and uneven. A mixing paddle attached to a drill ensures a smooth, lump-free consistency quickly. This tool not only saves effort but also improves the quality of your mixture, leading to better tile adhesion.
If you’ve ever struggled with clumpy grout, investing in a mixing paddle can change your experience completely. It’s a small tool but with a big impact on your project’s success.
Utility Knife
A sharp utility knife is indispensable for cutting underlayment, trimming mesh, or scoring tiles for a clean break. It gives you control over detailed cuts that larger tools can’t handle. Plus, it’s handy for opening packaging or scraping off excess materials.
Keep extra blades on hand to maintain clean cuts throughout your project. A dull blade can cause frustration and uneven edges, so swapping blades regularly makes your work neater and faster.
Credit: crystelmontenegrohome.com
Frequently Asked Questions
What Basic Tools Are Essential For Tiling A Bathroom Floor?
You need a tape measure, tile cutter, notched trowel, rubber mallet, level, and grout float. These tools help ensure accurate tile placement and smooth installation.
How Do I Choose The Right Tile Adhesive For Bathroom Floors?
Select a waterproof, mold-resistant adhesive designed for bathroom floors. Cement-based or epoxy adhesives are best for durability and moisture protection.
What Safety Gear Should I Wear When Tiling A Bathroom Floor?
Wear gloves, safety goggles, and knee pads. These protect your hands, eyes, and knees from sharp edges and prolonged kneeling during installation.
Can I Tile A Bathroom Floor Without Professional Help?
Yes, with proper tools and preparation, DIY tiling is possible. Follow instructions carefully and take your time to ensure quality results.
Conclusion
Tiling a bathroom floor seems challenging, but proper tools make it easier. Start with a reliable tile cutter for clean cuts. Use a notched trowel to spread adhesive evenly. A spirit level ensures tiles lie flat. Tile spacers maintain even gaps.
Grout float helps apply grout smoothly. Don’t forget safety gear like gloves and goggles. With these tools, your bathroom floor can look great. Practice patience and take your time. Tiling can be a rewarding project. You’ll enjoy the result every day.
Happy tiling!