
Is your kitchen faucet dripping nonstop, wasting water and driving you crazy? A leaky faucet isn’t just annoying—it can also raise your water bill and damage your sink area over time.
But don’t worry, you don’t have to call a plumber just yet. You can fix it yourself, even if you’ve never done it before. In this guide, you’ll discover simple, step-by-step tips to stop that drip for good. Keep reading, and you’ll save money, protect your home, and feel proud of your handy work.
Let’s get started!
Credit: plumbing-united.com
Common Causes Of Faucet Leaks
Leaky kitchen faucets can be more than just annoying; they waste water and increase your utility bills. Understanding why your faucet is dripping helps you fix it faster and avoid repeated repairs. Let’s look at the most common causes that lead to those persistent leaks.
Worn Out Washers
Washers act as tiny seals inside your faucet, controlling the water flow. Over time, these rubber or silicone washers wear down from constant friction and pressure. This wear creates gaps where water can escape, causing that steady drip you can’t ignore.
Have you ever noticed your leak gets worse after you turn off the tap hard? That’s often because the washer is compressed and damaged. Replacing the washer usually stops the drip immediately and is a simple fix you can do yourself.
Damaged O-rings
O-rings are small rubber rings that hold parts of the faucet together and create watertight seals. When these rings crack or break, they allow water to seep through joints, often near the base of the faucet handle. This can cause leaks that look like puddles forming around your sink.
O-rings degrade from mineral buildup or just age. Checking these and swapping them out can save you from a slow leak that eventually leads to bigger water damage.
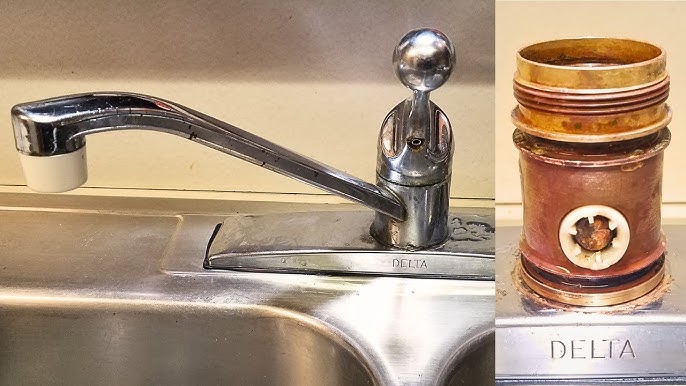
Corroded Valve Seats
The valve seat connects the faucet body to the spout, and it’s exposed to water constantly. Corrosion builds up here when minerals in water react with metal, creating rough surfaces. These rough spots prevent a tight seal, letting water leak out even if other parts are fine.
Have you felt your faucet handle getting stiff or noticed noises when you turn it? That could be valve seat corrosion. Cleaning or replacing the valve seat can restore smooth operation and stop leaks at their source.
Credit: www.youtube.com
Tools And Materials Needed
Fixing a leaky kitchen faucet requires the right set of tools and materials. Having everything ready before you start will save time and prevent frustration. Let’s dive into what you need to gather to make the repair process smooth and efficient.
Basic Tools Checklist
You don’t need an entire toolbox, but some basic tools are essential for this job. Most leaks come from worn-out washers or seals, which require disassembling parts of the faucet.
- Adjustable wrench:To loosen and tighten nuts without damaging them.
- Screwdrivers:Both flathead and Phillips for removing screws.
- Pliers:Helpful for gripping and turning small parts.
- Allen wrench (hex key):Necessary for handles secured with hex screws.
- Utility knife:To cut old plumber’s tape or clean edges.
- Cleaning cloth:To wipe away debris and water.
Make sure these tools fit your faucet model. Using the wrong size can cause damage.
Replacement Parts To Have
Identifying the exact part causing the leak helps you pick the right replacement. It’s common for washers, O-rings, or cartridges to wear out.
- Washers:These small rubber discs create a seal to stop water flow.
- O-rings:Circular rubber rings that prevent leaks at joints.
- Cartridge:If your faucet uses a cartridge, having a replacement ready is crucial.
- Plumber’s tape (Teflon tape):Used to seal threaded connections and prevent leaks.
Have you ever started a repair only to realize you’re missing a tiny but important part? Preparing replacements beforehand keeps you from that hassle.
Preparing For The Repair
Preparing for a kitchen faucet repair sets the stage for a smooth process. Proper preparation reduces mess and prevents damage. It also saves time and frustration. Focus on two main tasks before starting: turning off the water supply and clearing the work area. These steps help you work safely and efficiently.
Shutting Off Water Supply
Locate the water shutoff valves under the sink. Turn both the hot and cold valves clockwise to close them. If valves are missing or stuck, shut off the main water supply. Open the faucet to drain any remaining water. This prevents leaks during the repair and keeps the area dry.
Clearing The Work Area
Remove items from under the sink and around the faucet. Clear space to access pipes and tools easily. Lay down a towel or small bucket to catch drips. Have a flashlight nearby for better visibility. Organize tools like wrenches, screwdrivers, and replacement parts before starting.

Credit: www.youtube.com
Step-by-step Repair Guide
Fixing a leaky kitchen faucet is easier than many think. This guide breaks down the repair into clear, simple steps. Follow these instructions to stop the drip and save water.
Removing The Faucet Handle
Start by turning off the water supply below the sink. Use a screwdriver or Allen wrench to remove the handle screw. Lift the handle off gently. Keep screws and parts safe for reassembly.
Replacing Washers And O-rings
Look inside the faucet stem for worn washers or O-rings. These small parts often cause leaks. Remove old washers and O-rings carefully. Replace them with new ones of the same size. Lubricate new O-rings with plumber’s grease for smooth movement.
Cleaning Valve Seats
Check the valve seat for dirt or mineral build-up. Use a cloth or small brush to clean it thoroughly. If the seat is damaged, replace it with a new one. Clean valve seats help ensure a tight seal and stop leaks.
Reassembling The Faucet
Put the faucet parts back in reverse order. Secure the handle with screws. Turn the water supply back on slowly. Check for leaks by turning the faucet on and off. Tighten screws if needed for a perfect fit.
Testing The Repair
After you’ve replaced the worn-out parts and tightened the faucet components, it’s time to test your repair. This step confirms whether your efforts have stopped the leak or if further adjustments are needed. Testing the repair carefully will save you from unexpected water damage and frustration.
Turning Water Back On
Slowly turn the main water supply or the shut-off valves under the sink back on. Doing this gradually helps you spot any immediate issues without causing a sudden surge of water pressure.
Listen for unusual sounds like hissing or dripping right after turning the water on. These noises can indicate that something isn’t seated properly or that a part might still be loose.
Checking For Leaks
Inspect every joint and connection around the faucet closely. Use a dry cloth or paper towel to wipe around areas where leaks were present before; wet spots will show up quickly.
Don’t forget to test both the hot and cold water handles. Sometimes leaks only appear under pressure from one side, so thoroughness is key.
If you notice any dripping or pooling water, tighten the fittings a little more or recheck the washers and O-rings. Have you ever found that a small leak hides behind the faucet base? That’s why careful observation is essential.
Preventing Future Leaks
Regular maintenance is key to preventing future leaks in your kitchen faucet. Check for worn-out washers and loose fittings. Make timely replacements to ensure smooth operation and avoid unexpected drips.
Preventing future leaks in your kitchen faucet can save you both money and hassle. Imagine the relief of knowing you won’t have to deal with unexpected drips every time you walk into your kitchen. With a few proactive steps, you can extend the life of your faucet and keep those annoying leaks at bay.Regular Maintenance Tips
Regular maintenance is your first line of defense against leaks. Simple actions like cleaning the aerator regularly can prevent buildup of minerals that cause blockages. Make it a habit to check the seals and O-rings every few months. If they show signs of wear or tear, replace them promptly to avoid bigger issues later. Tightening loose parts can also help. But be cautious—over-tightening can lead to more damage. Keep your faucet’s exterior clean and dry. This prevents corrosion, which can weaken the seals and lead to leaks.When To Call A Professional
Sometimes, no matter how diligent you are, leaks persist. If you’ve tried all the DIY solutions and the drip continues, it might be time to call in a professional. A plumber can diagnose issues that aren’t visible to the naked eye, like internal corrosion or faulty installation. Consider professional help if your faucet is over a decade old. An expert can advise you on whether a repair or a replacement is the better investment. Remember, while it’s great to handle small repairs yourself, knowing when to seek professional help can save you from costly mistakes. What steps will you take today to ensure your kitchen faucet stays leak-free?Frequently Asked Questions
How Do I Stop My Kitchen Faucet From Leaking?
To stop a kitchen faucet leak, first turn off the water supply. Then, identify the leak source. Replace worn-out washers or O-rings. Tighten any loose parts. If leaking persists, consider replacing the cartridge or seek professional help.
What Tools Are Needed To Fix A Leaky Faucet?
Essential tools include an adjustable wrench, screwdriver, pliers, and replacement parts like washers or cartridges. A cloth helps prevent scratches. Having these tools ready ensures a smooth and efficient faucet repair process.
How Long Does It Take To Repair A Leaking Faucet?
Repairing a leaking faucet typically takes 30 to 60 minutes. Time varies based on leak severity and faucet type. Simple fixes like washer replacement are quicker, while cartridge swaps may require more time.
Can I Repair A Leaky Faucet Without Plumbing Skills?
Yes, many faucet leaks can be fixed with basic tools and instructions. Follow step-by-step guides carefully. Simple tasks like replacing washers or O-rings are beginner-friendly. For complex issues, consult a plumber.
Conclusion
Fixing a leaky kitchen faucet can save water and money. Small repairs often stop drips quickly. Follow each step carefully to avoid mistakes. Keep tools and parts ready before starting. A steady hand helps complete the job faster. Check your work to ensure no leaks remain.
Regular maintenance can prevent future problems. Simple repairs bring great relief from constant dripping. Take your time and be patient. You can handle this task with basic skills and care.