
Are you staring at your walls and thinking they could use a fresh coat of paint? Painting your home can seem like a daunting task, but it doesn’t have to be.
Imagine walking into a room that feels brand new, with colors that perfectly capture your style and personality. The right paint can transform your living space, boost your mood, and even increase your home’s value. With the right guidance, you can achieve that stunning transformation.
In this guide, you’ll discover simple, effective steps to paint your home like a pro, saving you time and money. Ready to turn your living space into the haven you’ve always wanted? Let’s dive in and explore the art of painting your home.

Credit: dabpaintingllc.com
Choosing The Right Paint
Choosing the right paint for your home can transform your living spaces and create a mood that resonates with your personality. The choice goes beyond mere color; it’s about understanding the finishes and hues that suit each room’s purpose and lighting. Imagine the joy of seeing a room come alive with the perfect shade and finish, reflecting your unique taste. Let’s dive into the essentials of picking the right paint for your home.
Types Of Paint Finishes
The finish of your paint affects both its durability and the look it provides. Are you aiming for a subtle sheen or a bold, glossy effect? Consider these common finishes:
- Flat/Matte:Ideal for low-traffic areas like bedrooms. It offers a smooth appearance but isn’t as easy to clean.
- Eggshell:Slightly more durable, perfect for living rooms. It gives a soft glow and is easier to clean than matte.
- Satin:Good for high-traffic areas like hallways. It has a hint of shine and stands up well to cleaning.
- Semi-gloss:Great for kitchens and bathrooms where moisture is a factor. It’s shiny and highly durable.
- Gloss:Best for trim and doors. It provides a reflective finish that highlights architectural details.
Think about how the finish will complement the room’s purpose and how often it will need cleaning.
Selecting Colors For Each Room
Color selection is a personal journey. What mood do you want each room to evoke? Consider your emotional response to different colors and how they interact with your furniture and decor.
- For a calm atmospherein bedrooms, opt for soft blues or greens.
- Inviting warmthin living areas can be achieved with earthy tones like terracotta or beige.
- Bright yellows or oranges in kitchens can stimulate appetiteand conversation.
- Bathrooms might benefit from clean whitesor light grays to promote relaxation.
Consider lighting—natural and artificial—as it can drastically change the perception of color. Would a bold red energize your dining room, or could it become overwhelming?
Credit: www.semiglossdesign.com
Essential Tools And Materials
Gather brushes, rollers, and drop cloths for a smooth painting process. Choose quality paint and primer for lasting results. Use painter’s tape to protect edges and ensure clean lines.
Painting your home can refresh and transform it. To achieve a smooth finish, it’s crucial to have the right tools and materials. This ensures your painting project is efficient and successful. Below, we explore the essential tools and materials needed for a seamless painting experience.Must-have Painting Tools
Having the right tools makes painting easier. A good paintbrush is key. Choose one with soft, flexible bristles. It helps with smooth strokes. Rollers are great for large areas. They cover surfaces quickly. Use a paint tray with your roller. It holds the paint and reduces spills. Painter’s tape is essential. It helps create clean lines. Use it on edges and corners.Protective Gear For Safety
Safety is important while painting. Wear protective gear to stay safe. Goggles protect your eyes from paint splashes. A dust mask is necessary. It prevents inhaling dust and fumes. Gloves keep your hands clean. They also protect from harsh chemicals. Cover your clothes with an old shirt or apron. It keeps your clothes free from stains. Equipped with these tools and gear, you’re ready to paint with confidence.Preparing Your Home
Painting your home starts with gathering the right tools and materials. Prepare the surface by cleaning and repairing any damage. Use painter’s tape to protect areas you don’t want painted. Choose the right paint type for each room for the best results.
Preparing your home for a fresh coat of paint is an essential step that can make or break your painting project. Skipping this phase is like trying to run a marathon without warming up—you’re bound to encounter problems. Proper preparation ensures a smooth, long-lasting finish and can even make the painting process more enjoyable. Let’s dive into the key steps you need to take to get your home ready for a stunning new look.Cleaning And Repairing Surfaces
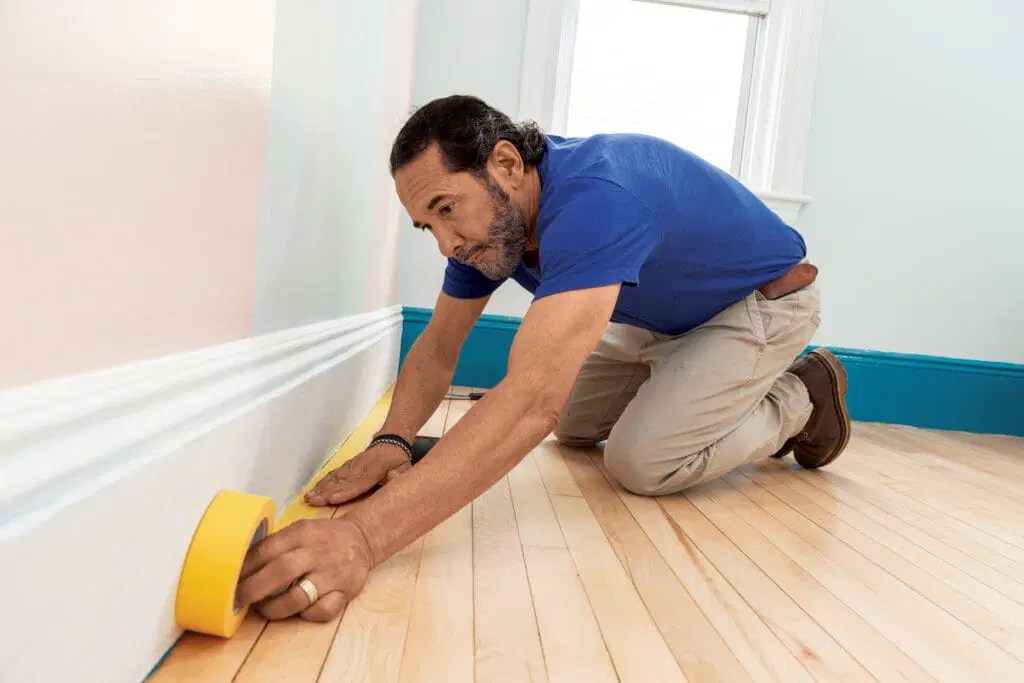
Before you even think about opening that can of paint, take a good look at your walls. Are there any cobwebs lurking in the corners or dusty patches that seem to have a life of their own? A clean surface is crucial for paint to adhere properly. Use a simple mixture of soap and water to wipe down walls, paying extra attention to areas like kitchens and bathrooms where grime can build up quickly. Once the cleaning is done, it’s time to tackle repairs. Even the smallest cracks or holes can affect the final outcome. Use spackling paste to fill in these imperfections, then sand them down for a smooth finish. Remember, a little effort now will make a big difference later.Taping And Covering Areas
Think of taping as setting the stage for your painting masterpiece. Precision here can save you hours of touch-up work later. Use painter’s tape to cover edges, trims, and any fixtures like light switches or outlets. It’s a simple step that ensures crisp, clean lines. Don’t forget to cover furniture and floors to protect them from accidental splatters. Old sheets or drop cloths work wonders here. If you’ve ever tried to scrub dried paint off hardwood floors, you know it’s a task worth avoiding. Isn’t it amazing how preparation can transform your painting experience? Taking the time to clean, repair, tape, and cover can turn what feels like a daunting task into an achievable project. What parts of your home do you think need the most preparation before painting?
Credit: www.bergerpaints.com
Techniques For A Smooth Finish
Proper surface preparation ensures a smooth finish. Sand rough areas and clean walls thoroughly. Apply primer before painting for better adhesion and durability.
Painting your home can be a rewarding project, transforming spaces with color and style. But achieving a smooth finish requires specific techniques and attention to detail. Whether you’re a seasoned DIY enthusiast or a first-timer, mastering these techniques can make all the difference in your painting results. Let’s dive into some practical tips to ensure your home looks professionally painted.Brushing And Rolling Tips
Using the right brush and roller can significantly impact the quality of your paint job. Opt for high-quality brushes that fit your hand comfortably, allowing for better control and precision. When rolling, apply paint in a ‘W’ or ‘M’ pattern to distribute the paint evenly across the wall. This technique prevents streaks and blotches, resulting in a more uniform finish. Remember to load your roller moderately—too much paint can lead to drips, while too little can cause uneven coverage. Have you ever struggled with roller marks? Try using a roller extension pole to maintain steady pressure and reach high areas effortlessly.Cutting-in Edges
Cutting-in is an essential skill for a crisp, professional-looking finish, especially around edges and corners. Use an angled brush for precise lines where walls meet ceilings and trim. Practice steady hand movements and keep your wrist straight to avoid wobbly edges. This technique is similar to outlining a drawing before coloring, ensuring clean borders that enhance the final appearance. Maintain a damp edge by working in small sections to keep the paint fresh and blend seamlessly. Do you find cutting-in tedious? Challenge yourself to improve your technique by honing your focus and patience—your walls will thank you!Dealing With Problem Areas
Painting your home can transform its look. But problem areas can make it challenging. Cracks, holes, and difficult surfaces need special attention. Addressing these issues ensures a smooth and lasting finish. Let’s explore some effective methods to tackle these problem areas.
Handling Cracks And Holes
Start by inspecting your walls for cracks and holes. Use a flashlight to spot hidden ones. Clean the area with a damp cloth. This removes dust and debris. For small cracks, apply a layer of spackling paste. Use a putty knife to smooth it out. Let it dry completely before sanding it smooth. For larger holes, use a patch kit. Follow the kit’s instructions carefully. This ensures the patch blends with the wall.
Managing Difficult Surfaces
Some surfaces resist paint. Glossy or greasy walls are challenging. First, clean them with a strong degreaser. This removes any oil or residue. Next, sand the surface lightly. This helps the paint adhere better. Use a primer specifically designed for difficult surfaces. Apply it evenly and let it dry fully. This step is crucial for a durable finish.
For textured surfaces, use a thick nap roller. This type of roller reaches into crevices. Apply paint in small sections for even coverage. Take your time to avoid missing spots.
Applying The Paint
Applying paint to your home can transform its look instantly. This stage is crucial for achieving a professional finish. Good preparation sets the stage, but applying paint requires skill. Let’s dive into the essentials for painting your home effectively.
Layering For Even Coverage
Even coverage is essential for a smooth finish. Start with a thin layer. Use a roller or brush for this. Ensure paint is spread evenly. Avoid applying too much at once. It can cause drips and uneven patches. Multiple layers are better for rich color. Allow each layer to dry before adding another. This ensures uniformity and depth.
Drying And Curing Times
Patience is key during this phase. Paint takes time to dry and cure. Drying occurs in a few hours. Check the label for exact times. Curing is different. It may take days or weeks. This is when the paint hardens fully. Avoid touching the walls during this period. Keep the room well-ventilated. This speeds up drying and curing. Use fans or open windows. Proper curing prevents peeling and cracking later.
Final Touches And Clean-up
The final touches and clean-up phase is crucial in home painting. It ensures a polished and professional look. This stage involves checking for any missed spots and cleaning your tools. Both steps are vital for a flawless finish. They also prolong the life of your painting supplies.
Inspecting For Touch-ups
Examine the painted surfaces closely. Look for drips, streaks, or uneven areas. Use good lighting to spot imperfections. A small brush can fix these easily. Make sure the paint matches the original color. Blend the new strokes smoothly. This prevents visible patches.
Cleaning Brushes And Tools
Properly clean brushes and rollers immediately after use. Use water for water-based paints. For oil-based paints, use mineral spirits. Rinse brushes under running water. Gently work out the paint. Use a comb to remove trapped paint. Let them dry completely before storing.
Store all tools in a dry place. This keeps them in good condition. Proper maintenance ensures they last longer. It also saves money on replacements. Clean and well-maintained tools make the next painting job easier.
Maintaining Painted Surfaces
Maintaining painted surfaces keeps your home looking fresh and vibrant. Proper care extends the life of your paint, saving you time and money. Regular upkeep ensures walls stay clean and colors remain bright.
Cleaning Painted Walls
Dust your walls using a soft cloth or duster. This prevents dirt buildup. For stains, use a mild detergent mixed with water. Gently scrub the area with a sponge. Rinse with clean water and pat dry with a towel. Avoid abrasive cleaners that can damage the paint.
Long-term Care Tips
Keep an eye out for chipped or peeling paint. Repair these spots quickly to prevent further damage. Use touch-up paint that matches your walls. When moving furniture, use pads to avoid scuffs. Maintain a stable indoor humidity level to prevent paint from cracking. Regularly inspect your walls for signs of wear.
Frequently Asked Questions
What Is The Best Type Of Paint For Walls?
For walls, latex paint is highly recommended due to its durability and easy maintenance. It provides a smooth finish and dries quickly. Latex paint is also easy to clean with water, making it ideal for high-traffic areas.
How Do I Prepare A Room For Painting?
Start by removing furniture and covering floors with drop cloths. Clean walls with mild soap and water. Fill holes and sand any rough areas. Use painter’s tape to protect trims and edges. Proper preparation ensures a flawless finish.
How Many Coats Of Paint Are Needed?
Typically, two coats of paint are sufficient for a uniform finish. The first coat covers imperfections, while the second enhances color vibrancy. However, the number of coats may vary based on the paint quality and wall condition.
What Tools Do I Need For Painting?
Essential tools include paintbrushes, rollers, painter’s tape, drop cloths, and a paint tray. A ladder is necessary for reaching high areas. These tools help achieve a professional-looking result and make the process more efficient.
Conclusion
Painting your home transforms its look and feel. It’s an easy way to refresh your space. Choose colors wisely; they affect mood. Prepare surfaces well for a smooth finish. Use quality brushes and rollers for best results. Keep the area clean to avoid mess.
Take your time for a neat job. Enjoy the process; it’s your creative project. With patience and care, your home will shine. Admire your handiwork and share it with others. Enjoy your newly painted home and its vibrant atmosphere.