
Are you ready to give your kitchen a fresh new look? Learning how to mount a kitchen sink is easier than you might think—and it can save you time and money.
Whether you’re upgrading an old sink or installing a brand-new one, this step-by-step guide will help you get the job done right. By the end, you’ll feel confident handling the tools and materials, and you’ll enjoy the satisfaction of a perfectly installed sink.
Keep reading to discover simple tips that make the process smooth and stress-free. Your kitchen makeover starts here!
Tools And Materials Needed
Mounting a kitchen sink requires the right tools and materials for a smooth process. Having everything ready helps avoid delays and mistakes. This section covers the essential tools, how to choose the right sink, and the necessary plumbing parts.
Essential Tools
Gather these tools before starting your kitchen sink installation. They make the job easier and safer.
- Adjustable wrench
- Pipe wrench
- Plumber’s putty or silicone sealant
- Screwdriver set (flathead and Phillips)
- Measuring tape
- Utility knife
- Hacksaw or tubing cutter
- Bucket (to catch water)
- Flashlight or work light
- Clamps (to hold the sink in place)
Choosing The Right Sink
Select a sink that fits your countertop and kitchen needs. Size and style matter for both function and look.
- Measure your countertop cutout carefully
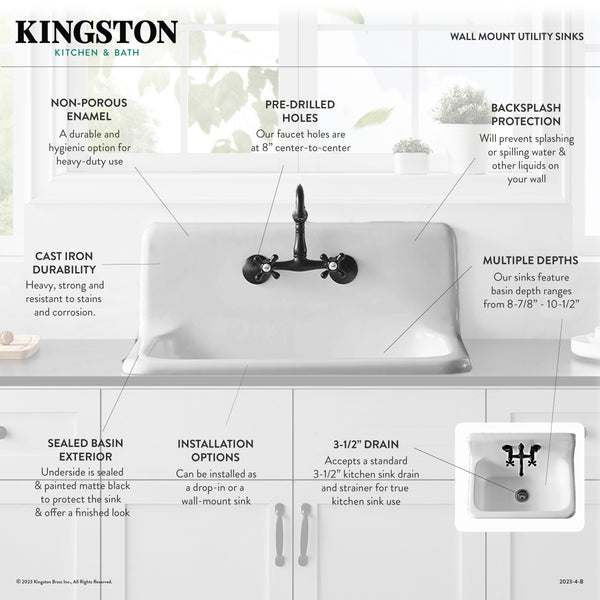
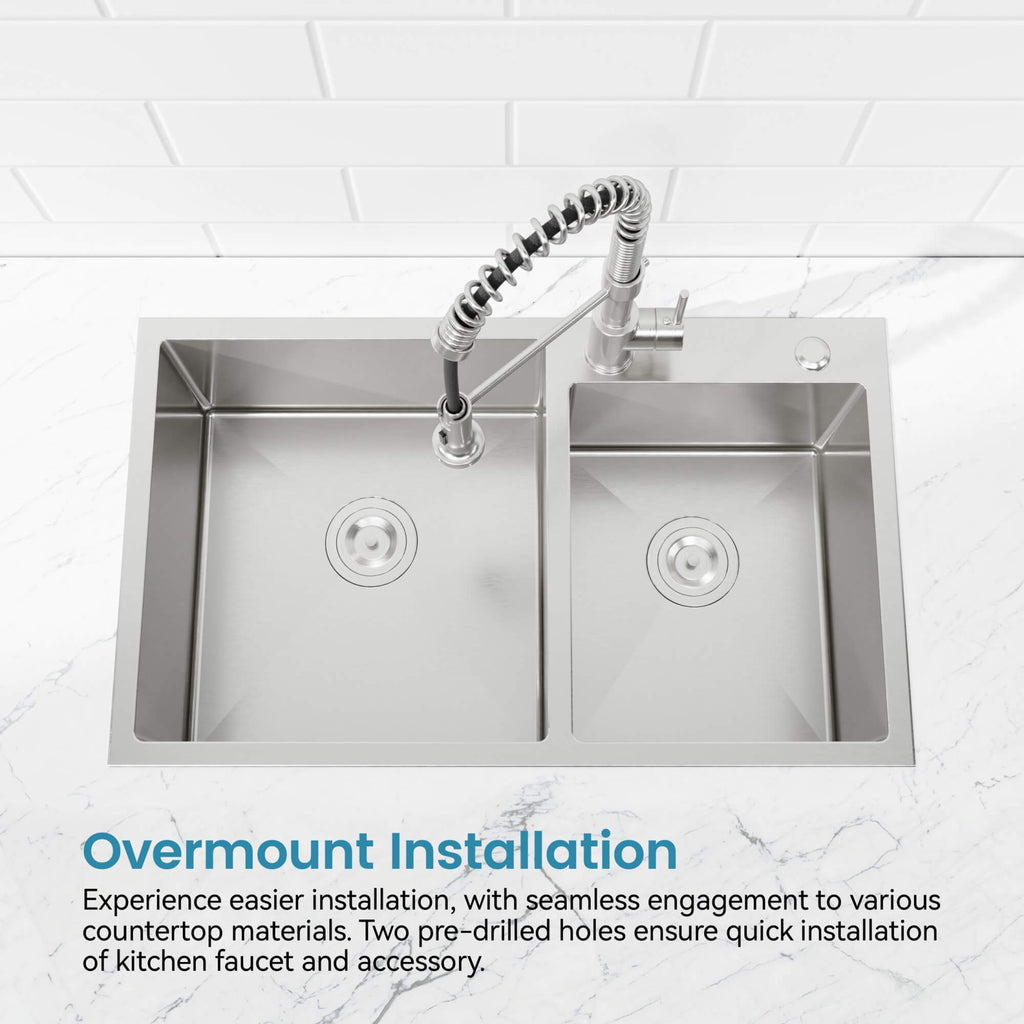
- Decide between top-mount or under-mount sinks
- Consider the number of bowls (single, double, or triple)
- Pick a material: stainless steel, porcelain, or composite
- Check the sink depth to fit your tasks
Necessary Plumbing Parts
Have these plumbing parts ready to connect your sink to water and drainage.
- Faucet (compatible with your sink)
- Drain assembly with strainer
- P-trap and tailpiece
- Water supply lines (hot and cold)
- Shut-off valves (if not already installed)
- Plumber’s tape (Teflon tape) for sealing threads
- Mounting clips and brackets
Credit: www.rbrohant.com
Preparing The Workspace
Preparing the workspace is the first key task before mounting a kitchen sink. This step ensures safety and smooth progress. A clean and organized area helps avoid accidents and damage. Proper preparation also saves time during installation.
Clearing The Area
Remove all items from under and around the sink area. Clear the countertop and cabinets to have enough working space. Keep tools and materials close but out of the way. Clean the surface to prevent dirt from getting into plumbing.
Shutting Off Water Supply
Turn off the main water valve or the valves under the sink. This stops water flow to avoid leaks and flooding. Open the faucet to drain remaining water in pipes. Keep a bucket and towels nearby for any spills.
Removing The Old Sink
Disconnect plumbing pipes carefully using a wrench. Detach water supply lines and drain pipes. Remove mounting clips or screws that hold the sink in place. Lift the old sink gently to avoid damage to the countertop.
Measuring And Cutting
Measuring and cutting the countertop for your kitchen sink is a critical part of the installation process. Getting this step right ensures a perfect fit and prevents costly mistakes. Taking your time and paying attention to details will save you from frustration later.
Measuring The Sink Opening
Start by carefully measuring the dimensions of your sink. Check the manufacturer’s specifications for the exact width, length, and depth required. Don’t forget to include any extra space needed for mounting clips or faucets.
Measure twice to avoid errors. Use a tape measure and jot down the numbers clearly. Think about the shape of the sink—whether it’s rectangular, oval, or round—and how that affects your cutting area.
Marking The Cut Lines
Place the sink upside down on the countertop and trace around the edge with a pencil. This outline will be your primary guide. To ensure accuracy, use a straight edge or ruler to double-check your lines.
Mark an inner line about a half-inch inside the traced edge for the actual cut. This gap accounts for the sink rim that will rest on the countertop. Would you rather cut a little too small or too big? It’s better to start smaller and adjust if needed.
Cutting The Countertop
Before you begin cutting, protect the surface with painter’s tape along your cut lines. This helps prevent chipping, especially on laminate or wood surfaces. Use a jigsaw with a fine-toothed blade for smooth cuts.
Slow and steady wins the race here. Cut just inside the marked line and check the fit frequently. If you’re nervous, practice on a scrap piece of similar material to build confidence.
Have you considered wearing safety goggles and a dust mask? Cutting countertop material can create fine dust and debris that you want to avoid inhaling or getting in your eyes.
Installing The Sink
Installing the sink is a pivotal moment in your kitchen project. It’s where all your prep work comes together, and the sink finally takes its place. Getting this step right ensures a leak-free, sturdy setup that serves you well for years.
Applying Sealant
Start by applying a generous bead of silicone sealant around the sink’s edge where it will meet the countertop. This creates a waterproof barrier that prevents water from seeping under the sink.
Use a sealant that’s designed for kitchens and bathrooms to withstand moisture and heat. Don’t rush this step—take your time to apply an even line. If you’ve ever had water damage under a sink, you know why this matters.
Positioning The Sink
Carefully lower the sink into the cutout on your countertop. Align it so the edges sit flush and the sink is centered properly.
It helps to have a second person assist you here to avoid any sudden shifts. Ask yourself: Is the sink sitting flat without rocking? Small adjustments now save big headaches later.
Securing The Sink In Place
Once positioned, secure the sink using the mounting clips or brackets provided by the manufacturer. These usually attach from underneath the countertop and tighten up against the sink rim.
Make sure each clip is tightened evenly to prevent gaps. If your sink doesn’t come with clips, use heavy-duty adhesive or additional sealant as a backup. A loose sink can cause leaks and damage, so double-check your work.
Connecting Plumbing
Connecting the plumbing is a crucial part of mounting a kitchen sink. Proper connections ensure water flows smoothly without leaks. This step involves attaching the faucet, connecting water lines, and installing the drain assembly. Each task requires attention to detail and the right tools.
Attaching The Faucet
Start by placing the faucet into the sink holes. Tighten the mounting nuts underneath the sink to secure it. Use a basin wrench for hard-to-reach areas. Make sure the faucet sits straight and does not wobble. Check the manufacturer’s instructions for any specific steps.
Connecting Water Lines
Attach the hot and cold water supply lines to the faucet. Use flexible braided hoses for easier installation. Wrap plumber’s tape around the threads to prevent leaks. Hand-tighten the connections, then use a wrench for a snug fit. Avoid overtightening to protect the fittings.
Installing The Drain Assembly
Begin by applying plumber’s putty around the drain flange. Insert the flange into the sink’s drain hole. From below, attach the rubber gasket and mounting nut. Tighten the nut to seal the connection. Connect the drain pipe and the P-trap to complete the assembly. Test for leaks by running water through the drain.

Credit: www.vevor.ca
Testing And Finishing Touches
Ensure the sink is secure by testing for any leaks. Adjust fittings to guarantee a snug fit. Clean the surrounding area for a polished finish.
Mounting a kitchen sink can be a rewarding project, but ensuring everything is in perfect order requires a meticulous approach to testing and finishing touches. Once your sink is securely in place, it’s time to ensure it functions flawlessly without any surprises down the line. This phase of the installation process is crucial for peace of mind and long-term satisfaction.Checking For Leaks
After connecting your plumbing, the first task is to check for leaks. Turn on the faucet and run water at both hot and cold settings. Observe all joints and connections for any signs of dripping or moisture. A small leak might seem insignificant, but it can lead to bigger problems if left unchecked. If you spot any leaks, tighten the fittings or apply plumber’s tape to ensure a secure seal. Don’t forget to check beneath the sink as well; sometimes leaks can occur out of sight, causing damage to cabinetry.Cleaning Up Excess Sealant
Sealant is a lifesaver, but it can get messy if not applied carefully. Once your sink is in place, inspect the edges where the sink meets the countertop. Use a utility knife or a plastic scraper to carefully remove any excess sealant. Be gentle to avoid scratching your countertop or sink surface. Wipe down the area with a damp cloth to remove any remaining residue, ensuring a clean and professional finish.Final Adjustments
After addressing leaks and cleaning up, focus on any final adjustments. Check that your sink is level and that all components, like the faucet and handles, are aligned properly. Make any necessary tweaks to ensure everything operates smoothly. Open and close the faucet handles to ensure they are functioning without obstruction. Does your sink drain efficiently? If water pools, consider adjusting the sink’s position or the drain assembly. This attention to detail ensures your kitchen sink not only looks great but works perfectly too. Mounting a kitchen sink may seem daunting, but with careful attention to these testing and finishing touches, you’ll achieve a result you can be proud of. What will you tackle next in your kitchen renovation journey?
Credit: www.wayfair.com
Frequently Asked Questions
How Do You Prepare The Countertop For Sink Installation?
Clean the countertop thoroughly and measure the sink dimensions. Mark the cutout area precisely using the sink template or measurements before cutting.
What Tools Are Needed To Mount A Kitchen Sink?
You need a jigsaw, screwdriver, plumber’s putty, adjustable wrench, clamps, and silicone sealant for proper sink installation.
How Do You Secure The Sink To The Countertop?
Apply plumber’s putty or silicone sealant on the sink flange. Position the sink, then tighten mounting clips or brackets underneath.
How To Connect Plumbing After Mounting The Sink?
Attach the faucet, drain pipes, and water supply lines. Check for leaks by turning on the water and inspecting connections.
Conclusion
Mounting a kitchen sink can be simple with clear steps. Take your time and follow each instruction carefully. Use the right tools to avoid mistakes and save effort. Check for leaks once the sink is in place. A well-installed sink makes kitchen work easier and cleaner.
Practice patience and you will finish the job successfully. A sturdy sink adds value and comfort to your home. Keep safety in mind and enjoy your new kitchen setup.