
What Tools Needed for Bathroom Exhaust Fan? Are you planning to install or replace a bathroom exhaust fan? Knowing the right tools you need can make the job faster, easier, and less frustrating.
Imagine starting the work only to realize you’re missing a key tool—that’s a headache you don’t want. You’ll discover exactly which tools will help you get the job done like a pro, even if you’re not an expert. Keep reading, and you’ll save time, avoid mistakes, and get your bathroom fresh and moisture-free sooner than you think.
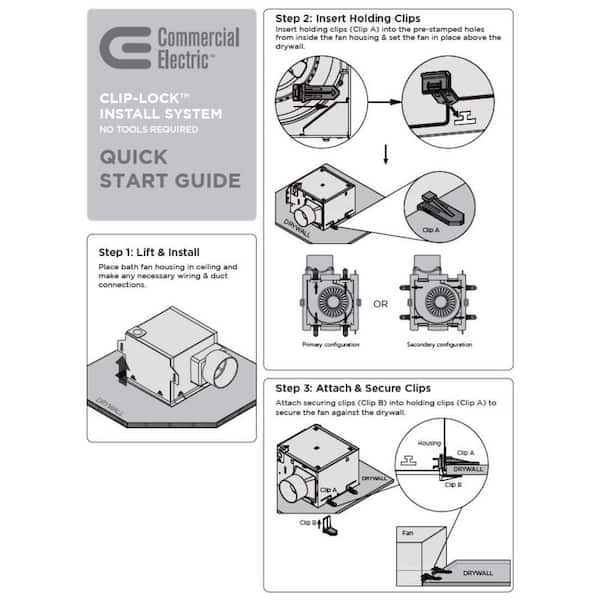
Credit: www.homedepot.com
Choosing The Right Exhaust Fan
Choosing the right bathroom exhaust fan can make a big difference in keeping your bathroom fresh and free from moisture. It’s not just about picking any fan off the shelf. You need to think about the type, size, and energy use to find the perfect fit for your space and needs.
Types Of Bathroom Fans
There are several types of bathroom exhaust fans designed for different purposes. Some are basic models focused solely on ventilation, while others come with added features like built-in lights, heaters, or humidity sensors.
If you have a small bathroom, a simple fan might work well. But for larger bathrooms or those with high moisture levels, consider a fan with a higher capacity or one that includes a humidity sensor to turn on automatically when needed. What features would make your bathroom experience better?
Size And Capacity Considerations
Choosing the right size is crucial. Fans are rated by their airflow capacity, measured in cubic feet per minute (CFM). The bigger your bathroom, the higher the CFM you’ll need to effectively remove moisture and odors.
A good rule of thumb is to have 1 CFM per square foot of bathroom space. For example, a 100-square-foot bathroom needs a fan rated around 100 CFM. If your bathroom has a tub or shower, add extra capacity to handle the increased moisture.
Energy Efficiency Ratings
Energy-efficient fans save money and reduce environmental impact. Look for models with the ENERGY STAR label, which meet strict efficiency standards without sacrificing performance.
These fans often use quieter motors and consume less electricity. Think about how often you’ll use your fan and whether investing in an efficient model could lower your utility bills over time. Could a quieter, energy-saving fan improve your bathroom routine?
Basic Tools For Installation
Having the right tools ready before you start installing a bathroom exhaust fan can save you time and frustration. Basic tools make the job smoother and help you avoid unnecessary trips to the hardware store. These essentials ensure you measure, drill, and secure the fan properly, giving you peace of mind that your installation is done right.
Measuring Tape And Pencil
Accurate measurements are the backbone of any successful installation. A measuring tape helps you mark where the fan will fit perfectly in your bathroom ceiling or wall.
Use a pencil to make light marks that guide your cuts and drilling. It’s a small step that prevents costly mistakes like cutting holes too big or in the wrong spot. Have you ever tried fixing a misaligned fan? Avoid that hassle by measuring twice and marking carefully.
Drill And Drill Bits
A reliable drill is essential for creating holes in drywall, studs, or joists. Choose drill bits that match the size of screws and anchors you’ll use for mounting the fan securely.
Drilling pilot holes before screwing helps prevent wood from splitting and ensures your fan stays firmly in place. If you don’t have the right drill bits, the job can become frustrating fast. What’s your experience with drill bits—do you prefer a set that covers multiple sizes?
Screwdrivers
Both Phillips and flathead screwdrivers are needed to attach the fan housing and connect wiring. These tools help you tighten screws without stripping them.
Having a variety of screwdriver sizes makes it easier to reach screws in tight spaces or awkward angles. If you’ve ever struggled with a stripped screw, you know why using the right screwdriver is worth the effort. Do you have a favorite screwdriver that always makes your DIY projects easier?
Electrical Tools And Safety Gear
Working with a bathroom exhaust fan requires specific electrical tools and safety gear. These tools help you install or repair the fan safely and efficiently. Using the right equipment prevents accidents and ensures the job is done correctly.
Safety gear protects you from electrical shocks and injuries. Proper tools make the wiring process easier and more precise. Below are essential tools and gear you need for electrical work on a bathroom exhaust fan.
Voltage Tester
A voltage tester checks if wires have power before touching them. It helps you avoid electric shocks by confirming the circuit is off. Always test wires first to work safely. This tool is simple to use and very important for any electrical task.
Wire Strippers
Wire strippers remove the insulation from electrical wires without cutting the wire itself. Clean wire ends make strong and safe connections. Choose wire strippers that fit the wire size you use. They save time and keep the wires in good condition.
Insulated Gloves And Safety Glasses
Insulated gloves protect your hands from electric shocks during wiring. They also keep your skin safe from sharp wire ends. Safety glasses shield your eyes from sparks or debris. Wearing both is crucial for safe electrical work in tight bathroom spaces.
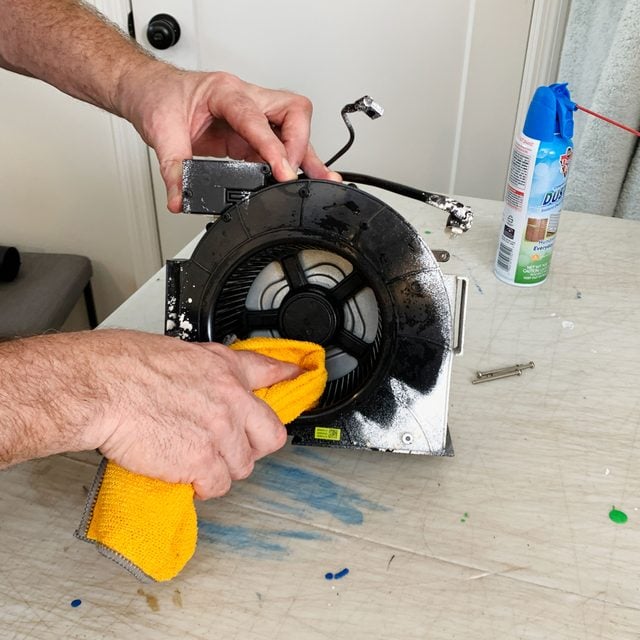
Credit: www.familyhandyman.com
Ventilation And Ducting Supplies
Proper ventilation and ducting supplies are essential for a bathroom exhaust fan to work well. These tools help move moist air outside your home. They keep your bathroom dry and prevent mold growth. Using the right supplies ensures the system runs quietly and efficiently.
Duct Tape And Clamps
Duct tape helps seal joints between duct pieces. It stops air leaks that reduce fan efficiency. Clamps hold ducts tightly in place. They keep connections secure and prevent rattling noises.
Flexible Ducting
Flexible ducting allows easy connection between the fan and vent. It bends around obstacles and fits small spaces. Choose ducts made from durable materials to last longer. Proper length prevents sagging or sharp bends that block airflow.
Wall Or Roof Vent Covers
Vent covers protect ducts from rain, debris, and animals. They come in different styles for walls or roofs. Covers also let air flow out without letting pests in. Select covers that match your home’s exterior for a neat look.
Additional Materials For A Smooth Install
Installing a bathroom exhaust fan needs more than just basic tools. Additional materials help ensure the fan fits well and works properly. These materials prevent air leaks, secure the fan, and maintain safe electrical connections.
Using the right extras makes installation smoother and the fan more efficient. It also helps the fan last longer and keeps your bathroom fresh and dry.
Caulking And Sealants
Caulking and sealants close gaps around the fan. They stop air and moisture from escaping. Choose waterproof sealants to protect against damp bathroom air. Apply evenly around edges for a tight seal. This reduces energy loss and prevents mold growth.
Mounting Brackets
Mounting brackets hold the fan firmly in place. They keep the fan stable and reduce vibration noise. Use brackets that fit your fan model and ceiling type. Secure brackets tightly to avoid movement and ensure safety.
Replacement Wiring
Replacement wiring may be needed if existing wires are old or damaged. Use wires with proper insulation and rating for bathroom use. Proper wiring keeps the fan safe from electrical hazards. Follow local electrical codes for a safe connection.
Tips For An Efficient Diy Setup
Setting up a bathroom exhaust fan yourself can save money and give you a sense of accomplishment. However, efficiency depends on how well you prepare and the tools you use. Paying attention to details early on can prevent common hassles and ensure your fan works perfectly for years.
Preparation And Planning
Start by measuring your bathroom size to pick the right fan capacity, typically measured in CFM (cubic feet per minute). Overestimating is better than underestimating to keep moisture and odors in check.
Gather all necessary tools before you begin, such as a drill, screwdriver, wire strippers, voltage tester, and duct tape. Having everything ready avoids interruptions and helps you focus on the task.
Think about the fan’s location—ideally near the shower or bathtub but away from lighting fixtures to avoid electrical issues. Planning the duct route carefully can save you from complicated fixes later.
Common Installation Mistakes
One mistake is neglecting to turn off the power at the breaker before starting. This simple step is crucial for your safety and prevents damage to the fan or wiring.
Another error is using the wrong size duct. A duct that is too small restricts airflow, reducing fan efficiency and causing noise. Make sure to match duct size to the fan’s specifications.
Improper sealing of duct connections leads to air leaks, which defeats the fan’s purpose. Use foil tape instead of duct tape for a more durable seal that won’t peel off over time.
Maintenance Tools
Keeping your exhaust fan clean is key to maintaining performance. A small vacuum with a brush attachment helps remove dust from fan blades and grilles.
Keep a screwdriver handy for removing the fan cover during cleaning or repairs. This simple tool makes maintenance quick and painless.
Consider a replacement filter if your fan model uses one. Regularly changing the filter prevents dust buildup and keeps the air fresh.

Credit: www.vevor.com
Frequently Asked Questions
What Tools Are Essential For Installing A Bathroom Exhaust Fan?
Basic tools include a drill, screwdriver, wire stripper, tape measure, and utility knife. These ensure proper fan mounting and wiring.
How Do I Choose The Right Tools For Fan Ventilation?
Select tools based on fan size, ceiling type, and electrical setup. Proper tools make installation safe and efficient.
Can I Install A Bathroom Exhaust Fan Without Specialized Tools?
Some installations may require special tools like a drywall saw or voltage tester. Basic tools alone might not suffice.
Which Tools Help Measure Bathroom Exhaust Fan Airflow Capacity?
A flow meter or anemometer measures airflow. These tools ensure your fan meets ventilation standards.
Conclusion
Installing a bathroom exhaust fan requires the right tools. A screwdriver, drill, and measuring tape are essential. Don’t forget wire strippers and a voltage tester. They ensure safe electrical connections. Safety goggles and gloves protect you during the work. With these tools, the installation becomes straightforward and safe.
Proper ventilation improves bathroom air quality. It reduces moisture and prevents mold growth. Remember, using correct tools makes the job easier. Enjoy a fresh and healthy bathroom environment. Your effort pays off with increased comfort and cleanliness.