

Looking for a fun and simple way to welcome guests this spooky season? You’re in the right place!
Creating a child ghost decor for your entryway is an easy project that adds a charming and playful touch to your home. Imagine your visitors’ smiles when they see these cute, floating ghosts greeting them at the door. In this guide, you’ll discover step-by-step tips to make your own ghost decorations quickly and affordably.
Ready to transform your entryway into a spooky, kid-friendly space? Let’s get started!
Credit: www.lemon8-app.com
Choosing Materials
Choosing the right materials can make or break your child ghost decor project. The materials you pick will affect how easy it is to create, how durable your ghost looks, and how safe it is for your little ones. Think about where you’ll place the ghost and how much handling it will get before you decide on fabrics, frames, and decorations.
Fabric Options
Lightweight fabrics work best for ghost decor because they move easily and create that floating effect. Cotton sheets or muslin are popular choices—you might already have them at home. These fabrics are breathable and easy to shape, making them perfect for crafting simple ghost figures.
If you want something more translucent, try cheesecloth or tulle. These add a spooky, ethereal vibe but can be a bit delicate, so handle with care. Consider how the fabric will look under different lighting—translucent fabrics can create interesting shadows that add to the ghostly effect.
Frame And Support
Your ghost needs a solid but lightweight frame to hold its shape. PVC pipes or wire hangers are affordable and easy to bend into the shapes you want. If you have kids helping, wire hangers are safer because they’re less rigid and easier to handle.
Try using a balloon as a base to drape your fabric over for a round ghost head. This simple trick gives your ghost a friendly, approachable look. You can also use foam balls or crumpled newspaper wrapped in tape if you want a sturdier option.
Decorative Accents
Adding eyes and a mouth brings your ghost to life. Felt or black construction paper works well for creating simple shapes. You can glue or sew these onto the fabric—choose what’s easiest for you and safe for your child to help with.
Think about other accents like ribbons or small LED lights to give your ghost personality and make it stand out. If your ghost will hang in a darker area, lights can make it glow and add a magical touch. What fun details can you imagine adding to make your ghost truly unique?
Designing Your Ghost
Designing your child ghost for the entryway is where creativity meets fun. This step lets you shape the spirit’s look and feel, making it truly unique. Think about how the ghost will catch the eye and bring a smile or a little spook to your guests.
Size And Shape Ideas
Choose a size that fits your entryway without overcrowding it. Small ghosts work well on side tables or shelves, while larger ones can stand proudly near the door.
Try different shapes beyond the classic round head and flowing sheet. Triangular or oval heads add a fresh twist, and uneven edges can make your ghost look like it’s floating.
- Use balloons or foam balls for heads
- Drape fabric loosely for a soft silhouette
- Experiment with wire frames for unique postures
Facial Features
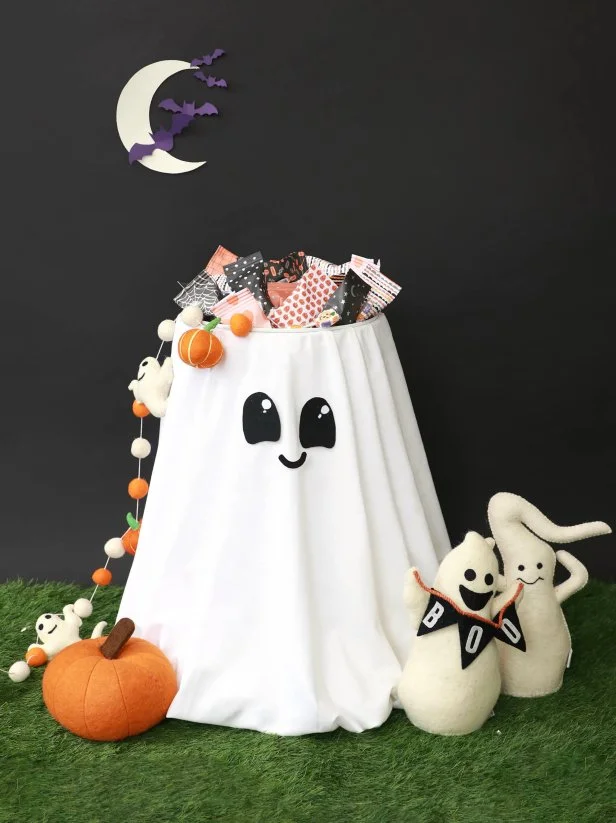
Facial features give your ghost its character. Simple black circles for eyes and a small mouth can look cute or spooky depending on their size and placement.
Try using felt or paper cutouts for eyes and mouth—they’re easy to change if you want to switch expressions later. Don’t forget that less can be more; sometimes just two eyes can say it all.
- Go for large, round eyes for a friendly ghost
- Sharp, slanted eyes add a mischievous vibe
- Use glow-in-the-dark paint to make features pop at night
Adding Personality
How will your ghost stand out? Adding little accessories can give it charm and personality. A tiny hat, a scarf, or even a little sign can tell a story.
Think about what your child likes and include those elements. Maybe a mini pumpkin or a favorite color ribbon will make the ghost feel more personal and inviting.
- Attach a small bow tie or a flower
- Use fabric scraps to create a unique texture
- Add a name tag or a funny ghost quote to spark smiles
What personality will your ghost have? Playful, shy, spooky, or silly? Your choices here can make your entryway decoration truly memorable.
Assembly Steps
Putting together your child ghost decor is where the magic truly begins. This part lets you bring your vision to life, piece by piece. Focus on clear cuts, snug fabric fits, and secure details to make a ghost that stands out in your entryway.
Cutting And Shaping
Start with a simple frame—cardboard or wire works well. Cut the shape of a child-sized ghost carefully, keeping the edges smooth. If you want a more playful look, try rounding the corners or adding small arms.
Have you thought about the ghost’s height? Matching it to your child’s size or your entryway space makes it more charming. Use scissors or wire cutters, depending on your frame, and always handle tools safely.
Attaching Fabric To Frame
Choose a lightweight, white fabric like cheesecloth or thin cotton to drape over your frame. Secure the fabric at the top first, then gently pull it down over the frame to avoid wrinkles. Use hot glue or fabric glue to keep it in place.
Don’t forget to leave some fabric loose at the bottom to create a floating effect. If you want the ghost to have some movement, avoid stapling or gluing too tightly. What fabric texture do you think would look best in your space?
Securing Details
Details bring your ghost to life. Use black felt or construction paper to cut out simple eyes and a mouth, then glue them onto the fabric. You can also add a little ribbon or a mini hat for personality.
Make sure all parts are firmly attached, especially if your ghost will be outside or in a drafty area. A few drops of hot glue usually do the trick. How will you add your personal touch to make your ghost unique?
Credit: www.nikkisplate.com
Adding Lighting Effects
Adding lighting effects brings your child ghost decor to life. Lights create a spooky and warm glow. They make the ghost stand out in the entryway. Proper lighting adds charm and sets the perfect mood. Choose the right lights and place them smartly for the best effect.
Choosing Safe Lights
Safety is key when adding lights near kids. Use LED lights because they stay cool and use less power. Battery-operated lights avoid tangled cords and reduce tripping hazards. Check that lights are labeled safe for indoor use. Avoid lights with frayed wires or broken bulbs. Always supervise the area where you place lights.
Placement Tips
Place lights where they highlight the ghost’s shape. Hide lights behind fabric or inside the ghost for a soft glow. Use clear tape or clips to secure lights without damage. Avoid blocking walkways or door openings with wires. Keep the entryway neat and safe for guests. Try different angles to see which looks best.
Creating Glow
Use white or warm-colored lights for a gentle glow. Wrap lights around the frame or inside the ghost’s body. Cover bulbs with thin white cloth for a diffused effect. Add a small light at the base to create an eerie ground glow. Dim the room lights to enhance the ghost’s glow. Experiment with light brightness to get the right spooky look.
Placement In Entryway
Placement in the entryway is key to making your child ghost decor stand out. The right spot can create a warm, spooky welcome. Think about how guests first see your home and place the ghost where it grabs attention. Balance visibility with space so it does not block pathways or doors. Smart placement makes your decor both charming and functional.
Best Spots For Impact
- Near the front door to greet guests instantly
- On a small table or shelf close to the entrance
- Hanging from the ceiling or a light fixture for a floating effect
- Next to a mirror to reflect the ghost and add depth
- Beside a potted plant for a natural, playful look
Combining With Other Decor
Pair the ghost with fall leaves or mini pumpkins for a festive feel. Use string lights or candles to highlight the ghost softly. Place a welcome mat with a Halloween theme nearby. Add a small sign saying “Boo!” or “Welcome” for a friendly touch. Keep colors consistent to tie the look together.
Safety Considerations
- Ensure the ghost does not block walkways or doors
- Keep it away from heat sources like lamps or heaters
- Use flame-safe materials if placing near candles
- Secure hanging decorations firmly to avoid falls
- Check for small parts that children could swallow
Maintenance And Storage
Keeping your child ghost decor looking fresh and ready for next season takes a little care. Proper maintenance and storage can save you time and effort later. Let’s dive into some smart ways to clean, store, and fix your ghost decor so it lasts year after year.
Cleaning Tips
Start by gently dusting off your ghost with a soft cloth or a feather duster. Avoid harsh chemicals that might damage delicate materials like fabric or paint. If your ghost is fabric-based, a light hand wash or spot cleaning with mild soap works well—just be sure to air dry it completely to prevent mold.
Have you noticed any stubborn stains or dirt? Use a soft brush to carefully scrub those areas without rubbing too hard. Keeping your decor clean not only preserves its look but also keeps it safe for your child to interact with during Halloween fun.
Storing For Next Season
Think about where you keep your ghost once the spooky season ends. Choose a cool, dry spot to avoid moisture damage. Wrapping your ghost in tissue paper or placing it inside a breathable fabric bag helps protect it from dust and prevents colors from fading.
If your ghost has any removable parts like hats or accessories, store those separately in labeled containers. This simple step makes reassembling your decor easier and keeps little pieces from getting lost. What’s your storage setup like? Could a small change make decorating easier next year?
Repairing Damage
Over time, your ghost might develop small tears or loose parts. Don’t toss it out just yet! A quick fix with fabric glue or a few stitches can bring it back to life. For painted decorations, touch up chips with matching acrylic paint to keep the ghost looking sharp.
Sometimes, a little creativity goes a long way. Adding new features like buttons for eyes or a fresh ribbon can cover imperfections and give your ghost a unique twist. Have you ever repaired something and ended up liking it even more than before?
Credit: www.hgtv.com
Frequently Asked Questions
What Materials Are Needed For Child Ghost Decor?
You’ll need white fabric, scissors, string, a marker, and a lightweight frame. Optional: glow-in-the-dark paint for added effect.
How Do I Make A Child Ghost Stand Upright?
Create a lightweight frame using wire or sticks. Attach fabric securely, ensuring balance so the ghost stands steadily.
Can I Customize The Ghost Decor For Kids?
Yes, customize with colorful markers or accessories. Add fun faces or hats to make it kid-friendly.
How Long Does It Take To Make The Decor?
It usually takes about 30 to 45 minutes. Time varies depending on detail and customization.
Conclusion
Creating a child ghost decor for your entryway brings fun and charm. It adds a festive touch that welcomes guests warmly. Simple materials and a little creativity make it easy to craft. Kids love joining in, making memories while decorating.
This project turns your entryway into a friendly, spooky space. Try it this season to enjoy a cheerful Halloween vibe. Keep the design safe and kid-friendly for the best results. Enjoy the smiles your ghost decor will bring to all visitors.