
Living in an apartment means dealing with noise—whether it’s from neighbors, traffic, or your own daily activities. But what if your furniture could help reduce that noise?
Imagine a quieter, more peaceful home where you can relax without distractions. In this post, you’ll discover how noise-reducing DIY furniture can transform your space. You’ll learn which options work best for apartment living, how easy they are to create, and the real difference they can make.
Keep reading to find out how to turn your home into a calm retreat with simple, effective solutions you can build yourself.

Benefits Of Noise-reducing Furniture
Noise-reducing furniture offers many benefits for apartment living. It helps create a peaceful space by lowering unwanted sounds. This furniture type improves daily comfort and productivity. It also provides an affordable way to reduce noise without major renovations.
Enhancing Apartment Quietness
Noise-reducing furniture absorbs sound waves effectively. It blocks noise from neighbors and street sounds. This furniture creates a calm and quiet home environment. Soft materials and special designs reduce echoes and vibrations. Apartments feel more peaceful and relaxing with these pieces.
Improving Focus And Relaxation
Less noise means better concentration for work or study. Quiet spaces help reduce stress and anxiety. Noise-reducing furniture supports rest and mental calmness. It creates cozy corners where you can unwind fully. This furniture helps improve sleep quality by lowering distractions.
Cost Savings Compared To Professional Solutions
Noise-reducing furniture costs less than professional soundproofing. No need for expensive construction or permits. Furniture can be moved or changed easily. It offers a flexible, budget-friendly way to reduce noise. This option suits renters and those on a tight budget.
Materials That Absorb Sound
Sound-absorbing materials reduce noise by trapping or dampening sound waves. Choosing the right materials for DIY furniture helps create a quieter apartment. These materials work well in small spaces where noise travels easily. Understanding their properties guides better design choices.
Foam And Acoustic Panels
Foam is lightweight and soft, making it perfect for sound absorption. Acoustic panels use foam or similar material to capture sound waves. Both reduce echo and lower noise levels effectively. They come in various shapes and thicknesses for different needs. Easy to cut and fit in custom furniture designs.
Dense Fabrics And Upholstery
Thick fabrics absorb sound by trapping air and vibrations. Upholstered furniture with dense fabric reduces noise reflection. Materials like velvet, wool, and heavy cotton work best. Adding cushions or fabric layers improves sound absorption further. Soft textures also add comfort and style.
Wood And Composite Boards
Wood and composites block and dampen sound with their density. Hardwoods absorb less sound but reduce noise transmission well. Composite boards with soundproof cores offer better absorption. These materials provide structure and noise control in furniture. Combining wood with soft layers enhances sound reduction.
Diy Furniture Ideas
Creating DIY furniture that reduces noise suits apartment living perfectly. These projects help make your home quieter and more comfortable. They also add style and function without much cost. Simple tools and materials can achieve big soundproofing effects. Here are some easy ideas to start with.
Soundproof Bookshelves
Bookshelves can block sound and store your books. Use thick wood or MDF boards to build strong shelves. Fill gaps with weatherstripping or foam tape to stop sound leaks. Add books and decorative items to absorb noise further. Place the bookshelf against shared walls for best results.
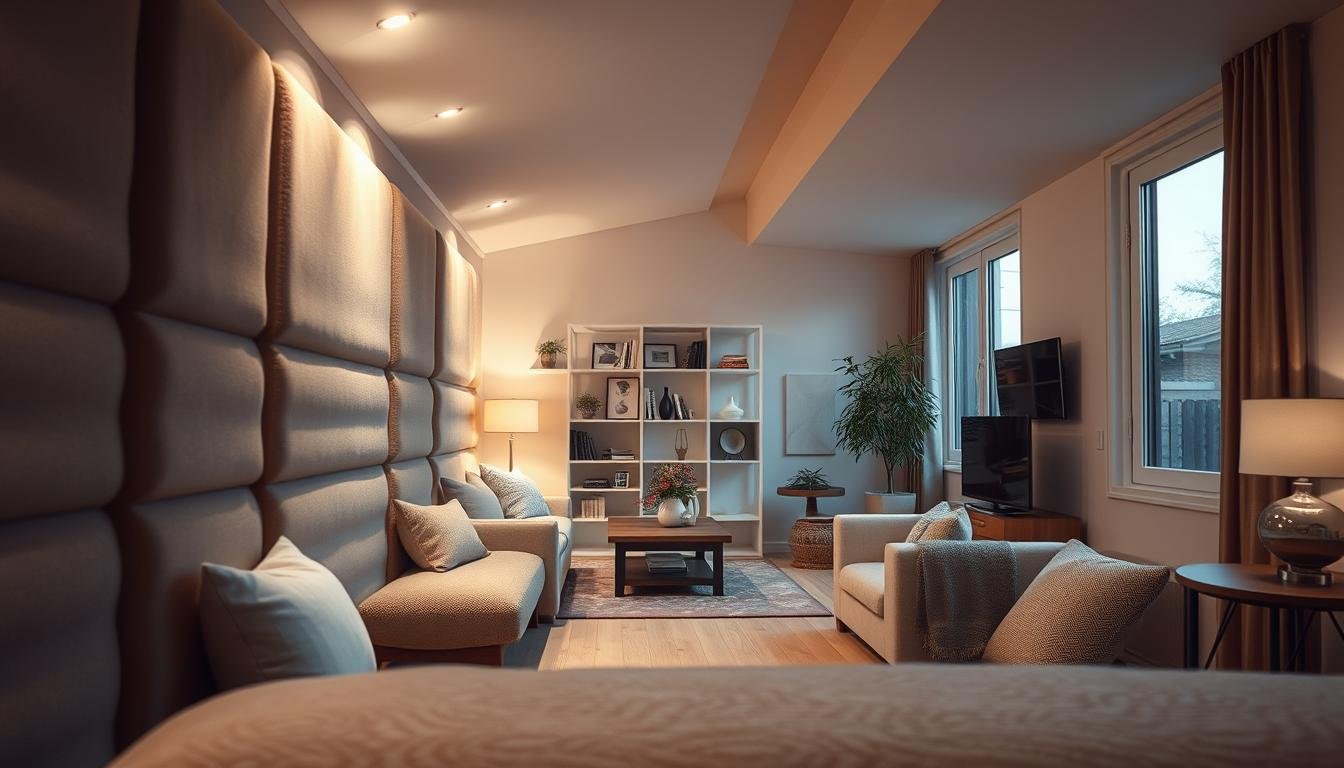
Upholstered Headboards
Soft headboards reduce noise from adjacent rooms. Choose a wooden frame covered with foam and fabric. Thick foam cushions sound and feels comfortable. Use heavy fabrics like velvet or canvas for better sound absorption. Mount the headboard securely to the wall behind your bed.
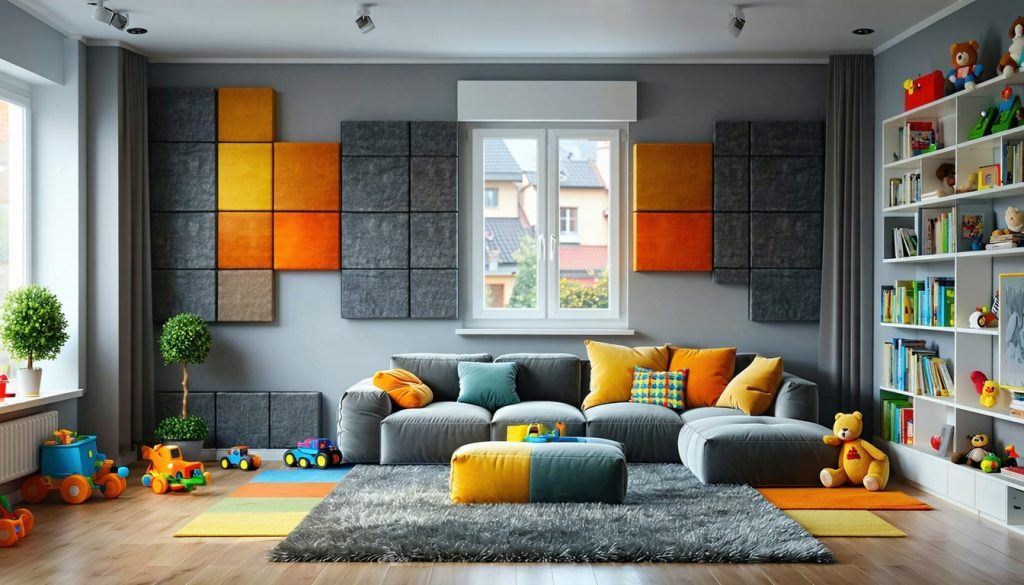
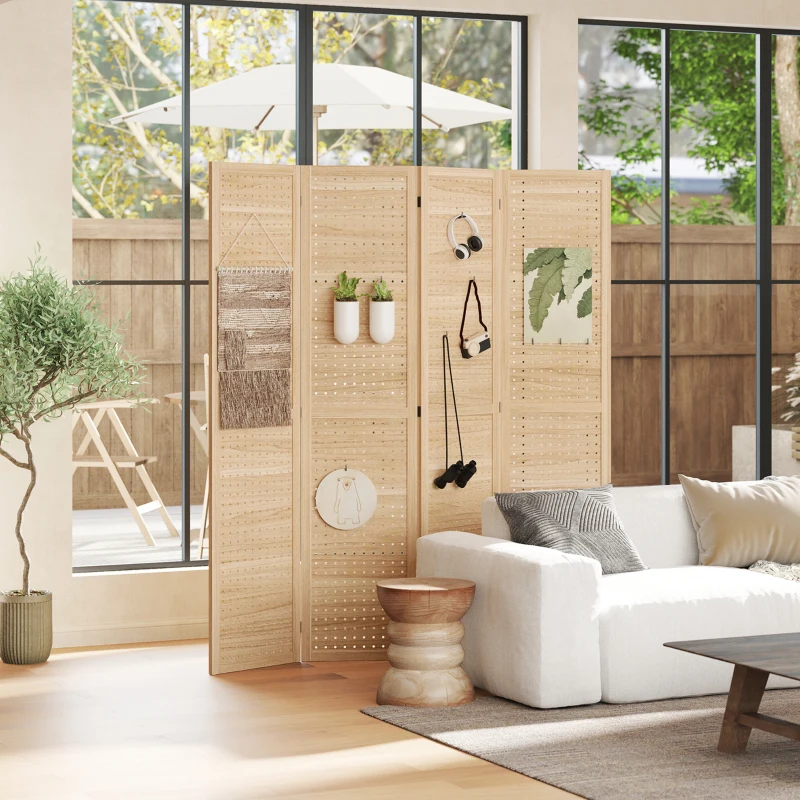
Room Dividers With Acoustic Panels
Room dividers create space and block sound. Attach acoustic panels or foam tiles to plain dividers. These panels absorb noise and reduce echoes. Choose lightweight frames for easy moving. Use dividers near noisy areas to create quiet zones in your apartment.
Step-by-step Diy Projects
DIY projects can transform your apartment into a quieter, more peaceful space. They help reduce noise and add a personal touch to your home. These projects use simple materials and tools. Each one focuses on absorbing or blocking sound effectively.
Follow these easy steps to build noise-reducing furniture. Each project is designed for small spaces and apartment living. The results improve comfort and privacy without heavy construction.
Building A Sound-absorbing Bookshelf
Start with a basic wooden bookshelf frame. Attach acoustic panels or foam to the back and sides. Use fabric to cover the panels for a neat look. Place books and decorative items inside to add mass and reduce sound. Secure the bookshelf against a shared wall for best effect.
- Choose a sturdy bookshelf frame
- Cut acoustic foam to fit inner sides
- Cover foam with breathable fabric
- Attach foam panels using strong adhesive
- Fill shelves with books and decor
Creating A Fabric-covered Headboard
Use a wooden board as the base for the headboard. Attach thick foam for sound absorption. Cover foam with soft fabric, stapling it neatly at the back. Mount the headboard on the wall behind your bed. It blocks noise from neighboring rooms effectively.
- Select a board size matching your bed width
- Glue or staple foam to the board
- Wrap fabric tightly around foam and board
- Secure fabric with a staple gun
- Hang headboard securely on the wall
Constructing A Portable Acoustic Divider
Create panels using lightweight wood or PVC frames. Stretch sound-absorbing fabric across each frame. Attach acoustic foam inside the frame for better noise control. Connect panels with hinges for easy folding and storage. Place the divider between noisy areas to block sound.
- Build rectangular frames with wood or PVC
- Staple fabric tightly over frames
- Insert foam inside the fabric-covered frame
- Attach panels with hinges
- Fold and move divider as needed
Placement Tips For Maximum Noise Reduction
Effective placement of noise-reducing DIY furniture can dramatically improve your apartment’s sound environment. It’s not just about what furniture you choose, but where you put it. Strategic positioning can absorb or block unwanted noise, making your living space more peaceful and comfortable.
Positioning Near Noise Sources
Placing sound-absorbing furniture close to the main noise sources is essential. If your apartment faces a busy street, position thick bookcases or upholstered pieces against the wall nearest to the noise. This setup helps trap sound before it spreads into the room.
Think about noisy neighbors too. A tall, cushioned divider or shelving unit near shared walls can soften the impact of loud conversations or footsteps. Have you noticed how a heavy curtain muffles street sounds? Furniture works similarly when placed wisely.
Utilizing Corners And Walls
Corners often amplify echoes, making noise seem louder. Adding bulky furniture like corner shelves or padded benches can reduce these reflections. Walls are another prime spot—filling empty wall space with thick furniture creates an extra barrier against sound.
Try placing a cushioned bench or storage ottoman snugly against a wall. This simple trick adds mass and softness, which quiets the room. Have you ever felt how a wall covered with books feels more solid and less noisy? That’s the effect you want.
Combining Furniture With Other Soundproofing Methods
Furniture alone won’t solve all noise problems, but combining it with other techniques can. Use rugs, curtains, and wall hangings alongside your DIY pieces to create layers of sound absorption. This combination traps sound waves more effectively.
For example, placing a thick rug under a noise-reducing bench enhances its effect by absorbing footstep noise. Pairing heavy curtains with a sound-absorbing bookshelf near windows can block outdoor noise better. What small changes could you make today that add up to big noise relief?
Comparing Diy Vs Store-bought Options
Choosing between DIY and store-bought noise-reducing furniture can be tricky, especially in an apartment setting where space and noise control are top priorities. Both options offer unique advantages and challenges. Understanding these differences can help you make a choice that fits your budget, style, and noise reduction needs.
Cost Differences
DIY furniture often starts cheaper because you mainly pay for materials and tools. If you already have supplies like wood, foam, or fabric, the cost goes down even more.
Store-bought options might seem expensive upfront, but they come ready-made, saving you time and effort. Plus, many brands offer warranties that DIY projects can’t match.
Ask yourself: How much is your time worth, and can you handle unexpected expenses if your DIY project hits snags?
Customization And Design Flexibility
DIY lets you tailor everything to your exact apartment layout and personal style. You can choose colors, sizes, and materials that match your decor perfectly.
Store-bought furniture has limited styles and sizes, but often offers sleek, tested designs that look professional. Customization usually means paying more or waiting longer.
If you want furniture that fits a tricky spot or matches a unique theme, DIY gives you control. But if you prefer quick solutions with guaranteed aesthetics, store-bought might be better.
Effectiveness And Durability
Store-bought noise-reducing furniture is usually tested for performance and built with durable materials. This means better long-term noise control and less wear and tear.
DIY projects can be just as effective if you choose quality materials and follow good construction practices. However, durability depends heavily on your skills and the materials used.
Consider how much noise you need to block and how long you want the furniture to last. Will a handmade piece hold up over time, or is a commercial product a safer bet?
Maintenance And Longevity
Maintaining noise-reducing DIY furniture in your apartment is key to ensuring it lasts and performs well. Proper care extends the life of the materials that absorb sound and keeps your space peaceful. Paying attention to small details in upkeep can save you from costly repairs or early replacements.
Cleaning Tips For Acoustic Furniture
Dust and dirt can build up on acoustic panels and upholstered surfaces, reducing their effectiveness. Use a soft brush or vacuum with a brush attachment to gently clean fabric parts without damaging the fibers.
Spot clean stains quickly using a mild detergent mixed with water. Avoid soaking the materials, as excess moisture can harm the sound-absorbing core.
Consider using removable covers on cushions or panels that you can wash regularly. This simple step keeps your furniture fresh and maintains its noise-reducing qualities over time.
Repair And Upkeep
Check your furniture regularly for loose joints, sagging upholstery, or peeling acoustic foam. Tighten screws and re-glue joints promptly to prevent further damage.
If the fabric tears or foam becomes compressed, repair or replace those parts quickly. Ignoring small problems can lead to a loss in sound absorption and structural integrity.
Keep an eye on the furniture’s placement too. Moving pieces around to avoid direct sunlight or moisture can significantly slow down wear and tear.
When To Upgrade Or Replace
Ask yourself: Is your furniture still effectively reducing noise, or has it lost its edge? If soundproofing feels weaker despite cleaning and repairs, it might be time to consider an upgrade.
Also, if the furniture shows significant signs of wear like deep stains, broken frames, or permanently crushed foam, replacing it can improve your living environment.
Upgrading doesn’t always mean starting from scratch; sometimes, swapping out worn panels or adding new acoustic elements can refresh your setup.
Frequently Asked Questions
What Materials Work Best For Noise-reducing Diy Furniture?
Soft, dense materials like foam, felt, and cork absorb sound effectively. Wood with insulation layers also helps reduce noise in DIY furniture.
How Can Diy Furniture Improve Apartment Noise Control?
DIY furniture with sound-absorbing features minimizes noise reflection. It creates a quieter living space by blocking and dampening sound waves.
Are Noise-reducing Diy Furniture Projects Cost-effective?
Yes, DIY projects use affordable materials and save on professional installation. They offer budget-friendly solutions for soundproofing small apartment spaces.
Which Furniture Types Are Best For Noise Reduction?
Bookshelves, upholstered benches, and padded headboards reduce noise well. These furniture pieces add layers that absorb and block unwanted sounds.
Conclusion
Choosing the right noise-reducing DIY furniture can improve apartment living. Quiet spaces help you relax and focus better. Simple projects can cut sound without costing much. Materials like foam, fabric, and wood work well. Each option fits different budgets and skills.
Try combining ideas to find what suits you. Small changes make a big difference in noise control. Enjoy a peaceful home with less noise today.